Github action 的开发到发布
文章目录
Github action 这东西是好东西, 但我看了一下, 很多朋友都是停留在用的阶段, 其实偶尔也要换换口味, 自己开发一个 action, 而不是仅仅是用
简介
github actions 是 github 推出的一个工作流的工具, 目的是为了帮助我们在某些情况下主动触发仓库的动作, 从而完成 单元测试/CI/CD, 甚至包括 release,发布包管理工具等等
官方关于 actions 有关的一些仓库都在这里: https://github.com/actions , 文档在这里
github 的主语言是 js, 当然也肯定也支持 ts
另外如果对于速度需求并不高的朋友, 也可以使用 docker, 但因为 docker 安装的过程会根据镜像大小有一定的耗时, 所以不一定适用于所有朋友
如果,你对于本文章不是很感兴趣,可以参考 创建 action 的文档
新建
因为我对于 js 比较不喜欢, 所以使用 ts(虽然也不是很感冒, 但是会好一点)
进入这个 仓库 , 然后使用

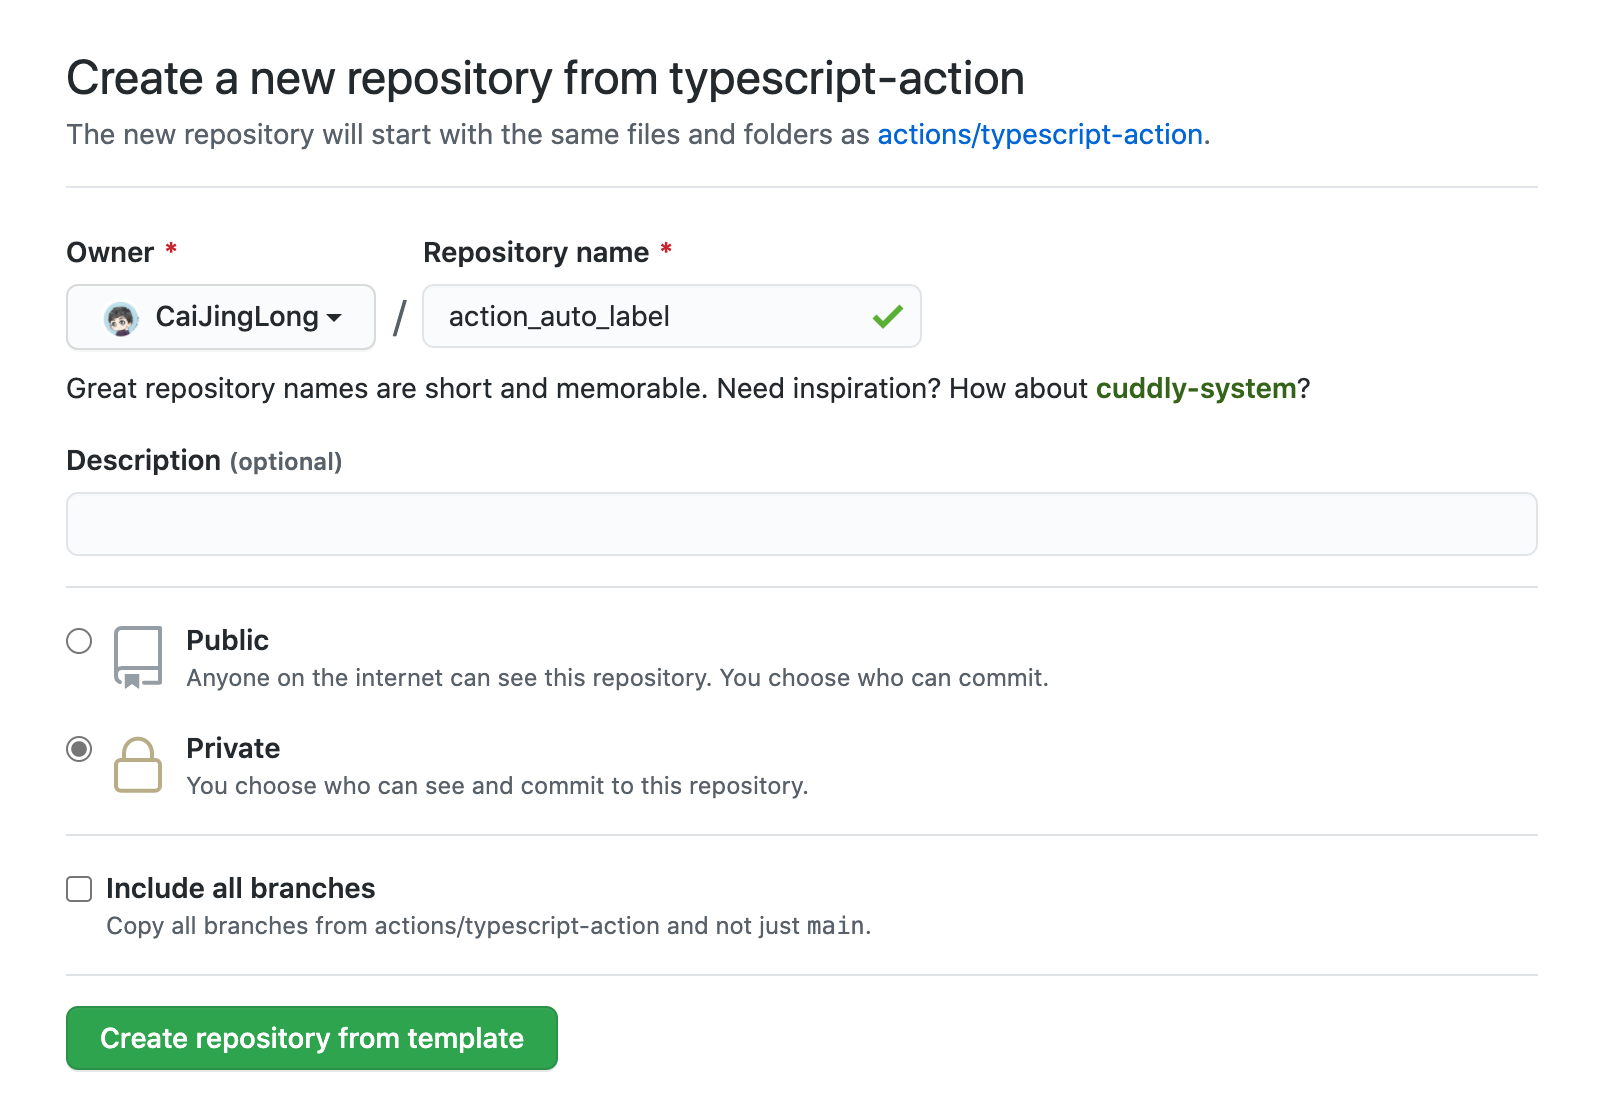
这里我们创建一个仓库, 这个仓库的目的是自动给 issue 打上 label
初始化后的仓库
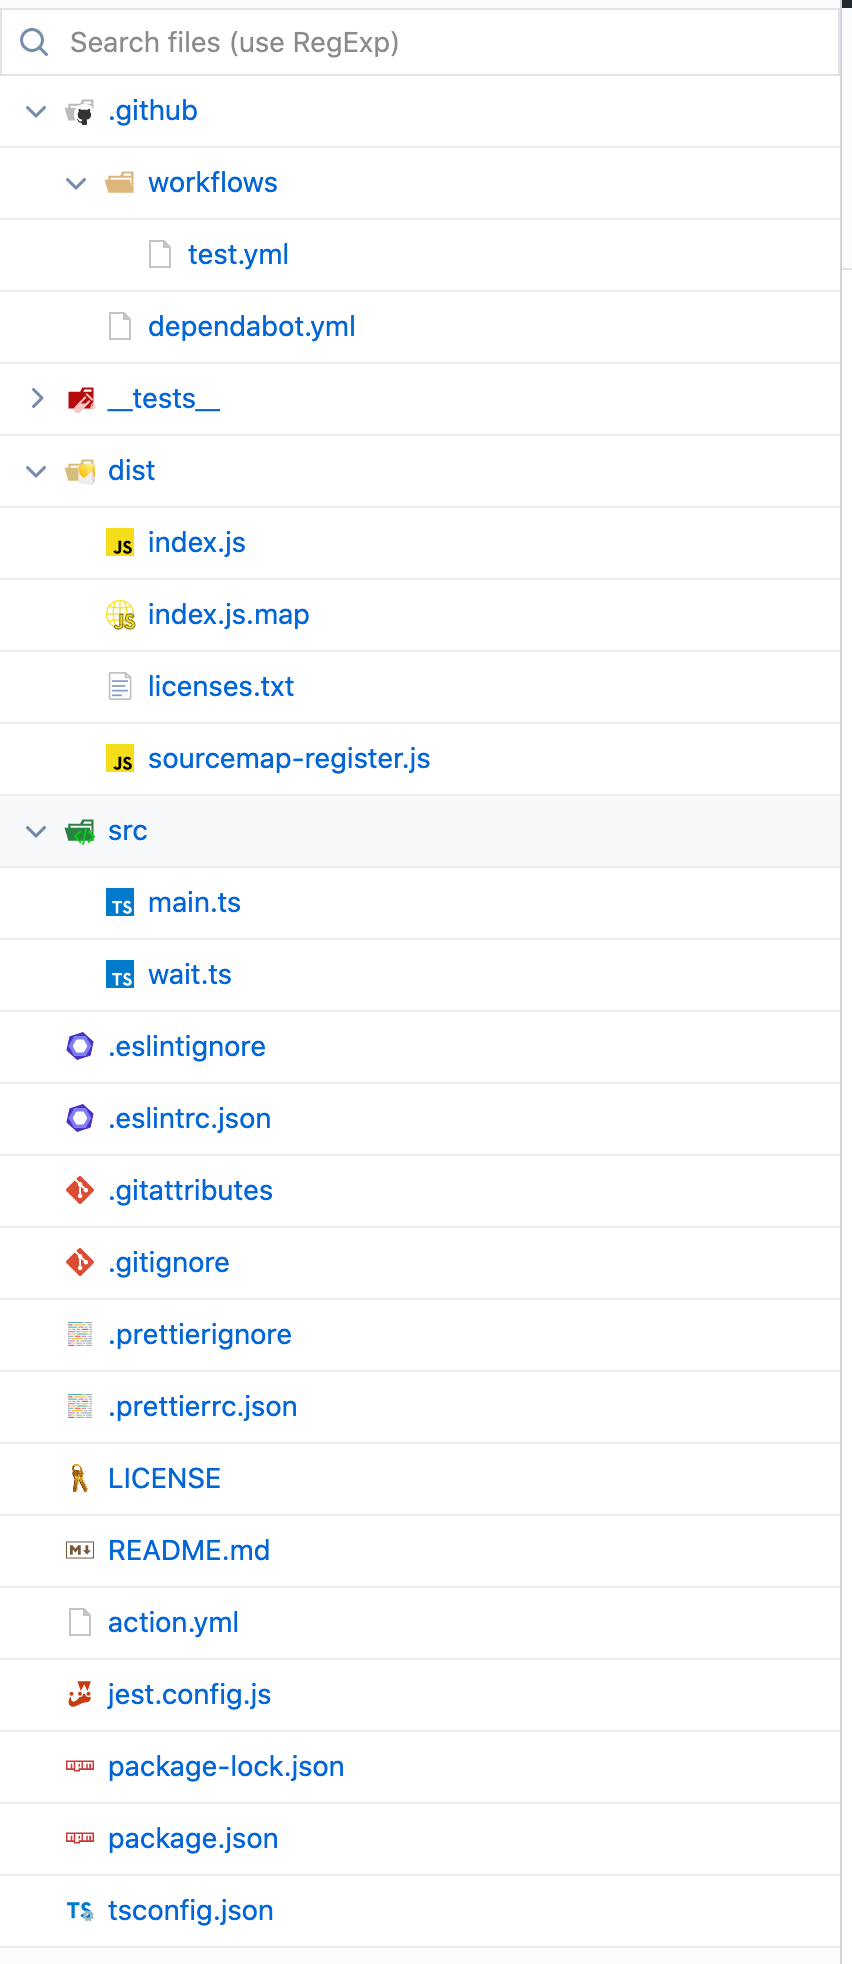
简单介绍一下这个仓库, 有一些文件和注意事项
- action.yml 是 action 本身的配置文件(别的项目实际就是读取这个东西来确定入口在哪里), 包括参数的配置都是这东西
- 一个标准的 npm 项目, 指定了入口
- src 内是主要的 ts 代码
- ts 代码需要被编译为 js 才能使用
- dist 内就是编译产物, git 的版本控制需要包含 dist 下的所有文件, 不然运行的时候会是老代码
- 项目本身自带 action, 主要是 CI 这个项目的
入门
开发环境
- vscode, 我这里是使用 vscode 进行编辑, 你请根据自己的情况
- npm(node), 我是使用 nvm 管理的
如果你的 node 大于 12.0, 理论上不用动
clone 项目
1git clone https://github.com/CaiJingLong/action_auto_label.git
2cd action_auto_label
3npm i
官方支持库
toolkit 包含了 github 官方支持的一些库, 就不一一介绍了
- @actions/core actions 的核心库, 会被默认包含
- @actions/exec 如果你需要执行 cli 工具, 比如 ls, mkdir, 之类的操作, 可以用这个, 可以便利的封装过程和日志输出之类的东西
-
@actions/io
glob 匹配文件, 我们都知道
ls *.sh这样的东西, 这个*就是 glob, 而不是正则 - @actions/github github 的封装, 这东西就包含了操作 github 本身的操作
因为本篇要操作 github, 所以我们把这个东西加入以下
npm i @actions/github
Hello world
这里要注意, ts 中不建议我们使用console.log来输出日志, 所以我们这里使用core.info方法来输出
老规矩, 先 hello world 一下.
src/main.ts
 1import * as core from "@actions/core";
 2
 3async function run(): Promise<void> {
 4  try {
 5    core.info(`Hello world`);
 6  } catch (error) {
 7    core.setFailed(error.message);
 8  }
 9}
10
11run();
.github/workflows/issue.yml
 1name: "On issue"
 2on:
 3  issue:
 4    types: [opened, reopened, edited]
 5jobs:
 6  build:
 7    runs-on: ubuntu-latest
 8    steps:
 9      - uses: actions/checkout@v2
10      - uses: ./
npm run all 打包, 这一步很重要, 不然 dist 不会生效, 可以考虑使用 git hooks 来做
然后是 push 代码, 接着 新建一个 issue 来触发一下
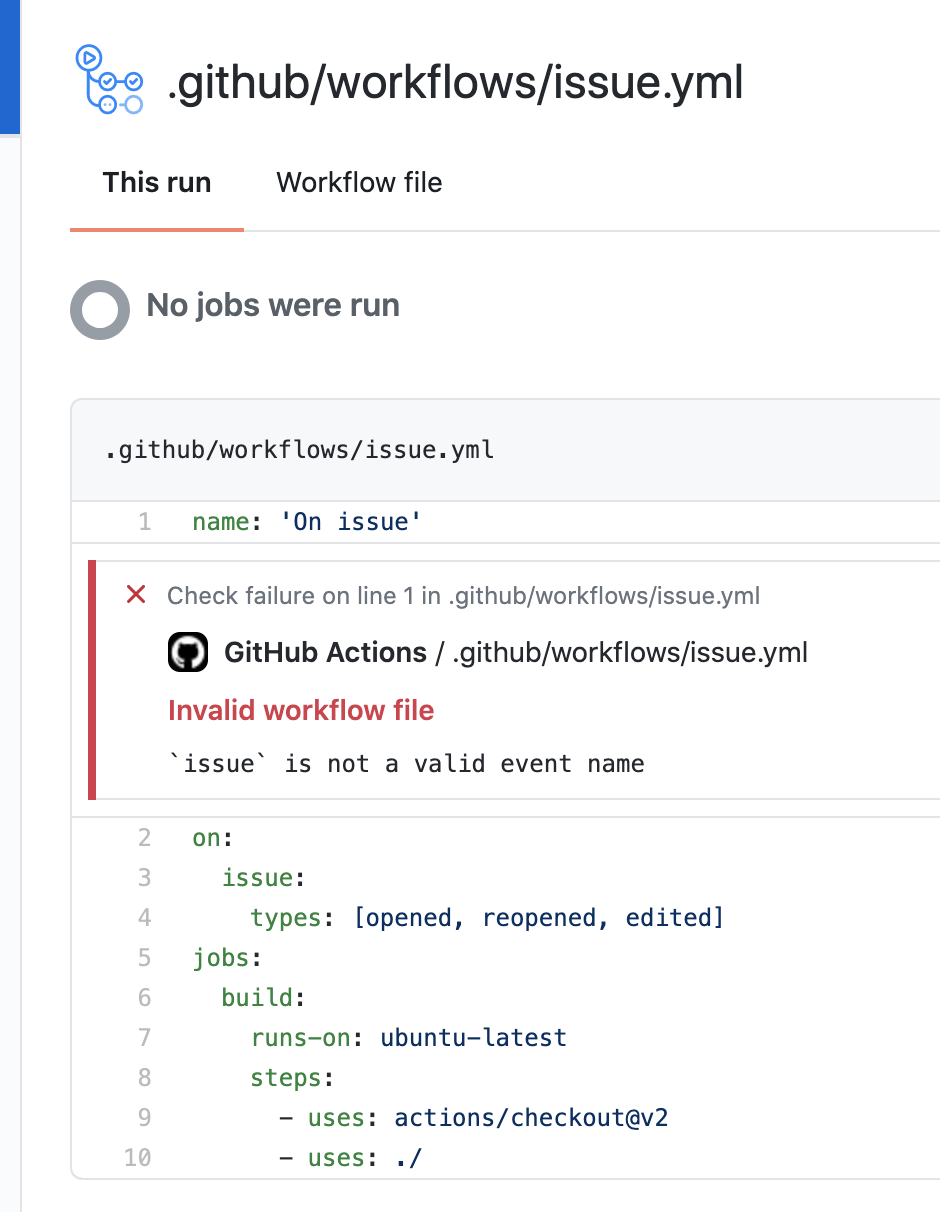
issue 报错了, 说不是合法的 event name. 好吧, 这里需要修改为 issues, 我们重新提交一下, 然后再触发它. 因为这里有 edited 可以触发, 我们修改一下 issue 的内容, 然后重新 commit
 1name: "On issue"
 2on:
 3  issues:
 4    types: [opened, reopened, edited]
 5jobs:
 6  build:
 7    runs-on: ubuntu-latest
 8    steps:
 9      - uses: actions/checkout@v2
10      - uses: ./

这次, 成功触发了 action, 并且输出了 Hello world.
action.yml 配置
前面说过, 这个文件是 action 的配置文件(或者可以叫清单文件), 其中有一些配置选项
在 actions 中可以配置参数, 以便于从外部传入, 默认的
默认的文件内容如下:
 1name: "Your name here" # 顾名思义, action的名字
 2description: "Provide a description here" # 对于action的说明
 3author: "Your name or organization here" # 作者名/组织名/email 之类的信息
 4inputs: # 参数的字典
 5  milliseconds: # change this # 参数名,
 6    required: true # 是否是必填
 7    description: "input description here" # 参数的说明
 8    default: "default value if applicable" # 默认值
 9runs: # 运行的环境
10  using: "node12" # 运行环境为 node12
11  main: "dist/index.js" # 入口文件, 就是这个东西要求我们必须编译ts为js后才可用
看过了默认文件内容后, 我们要开始尝试修改了 (文档在这里) , 我们通过文档得知, 有如下的配置参数
-
name -
author -
description -
inputs -
outputs -
outputsfor composite run steps actions -
runsfor JavaScript actions -
runsfor composite run steps actions -
runsfor Docker actions -
branding
在配置中没有出现的 2 个参数
- outputs: 输出参数, 因为各个 action 之间其实互相是不知道的, 用这个, 可以做到约定式输出, 比如我在 actions 1 里执行了某个东西, 并将其中计算的结果放到这个参数内, 后面就可以用了, 可以简单理解为 action 的返回值
- branding: action 对应的徽章样式, 是在 GitHub Marketplace 里的样子
我们知道 runs 支持三种形式
- js(本篇就用的这个)
- composite: 复合式, 其实就是使用 linux 命令(当然如果是 macos 设备, 理论上也支持), shell 脚本
- Docker: 使用 docker 环境,优点就不多说了, 配置方便, 普适性较强, 缺点是没有 js 和 composite 快, 毕竟加载 docker 需要时间, 镜像越大速度越慢
inputs 有一个需要注意的点: 在 js 代码里获取的时候, 使用原名称即可, 但如果你是在 shell 里使用(composite, 或其他语言, 比如 docker 使用 c 语言或者 java 等等), 则需要通过 INPUT_<VARIABLE_NAME>的名称在环境变量里获取
简单的概念完成了, 接着我们就来实战一下
环境变量
环境变量就是你在配置自己的工作流时, 可以使用 $ENV_VAR这种方式来使用环境变量, 至于来源, 看
github 默认的环境变量
, 包括但不仅限于$HOME,$GITHUB_WORKSPACE之类的, 具体看官方文档
配置敏感信息的问题
我们都知道, 很多情况下, 项目有一些隐秘信息, 不能直接配置在项目内, 包括但不仅限于:
- github token
- 各种账号的用户名密码
- 私钥信息
- 各种网站的 api key,app key, secret key 等等
这时候, 就需要有一些技巧来配置它们, 并在代码中读取, 官方文档
配置
这一步是在 github 仓库的 setting 里完成的

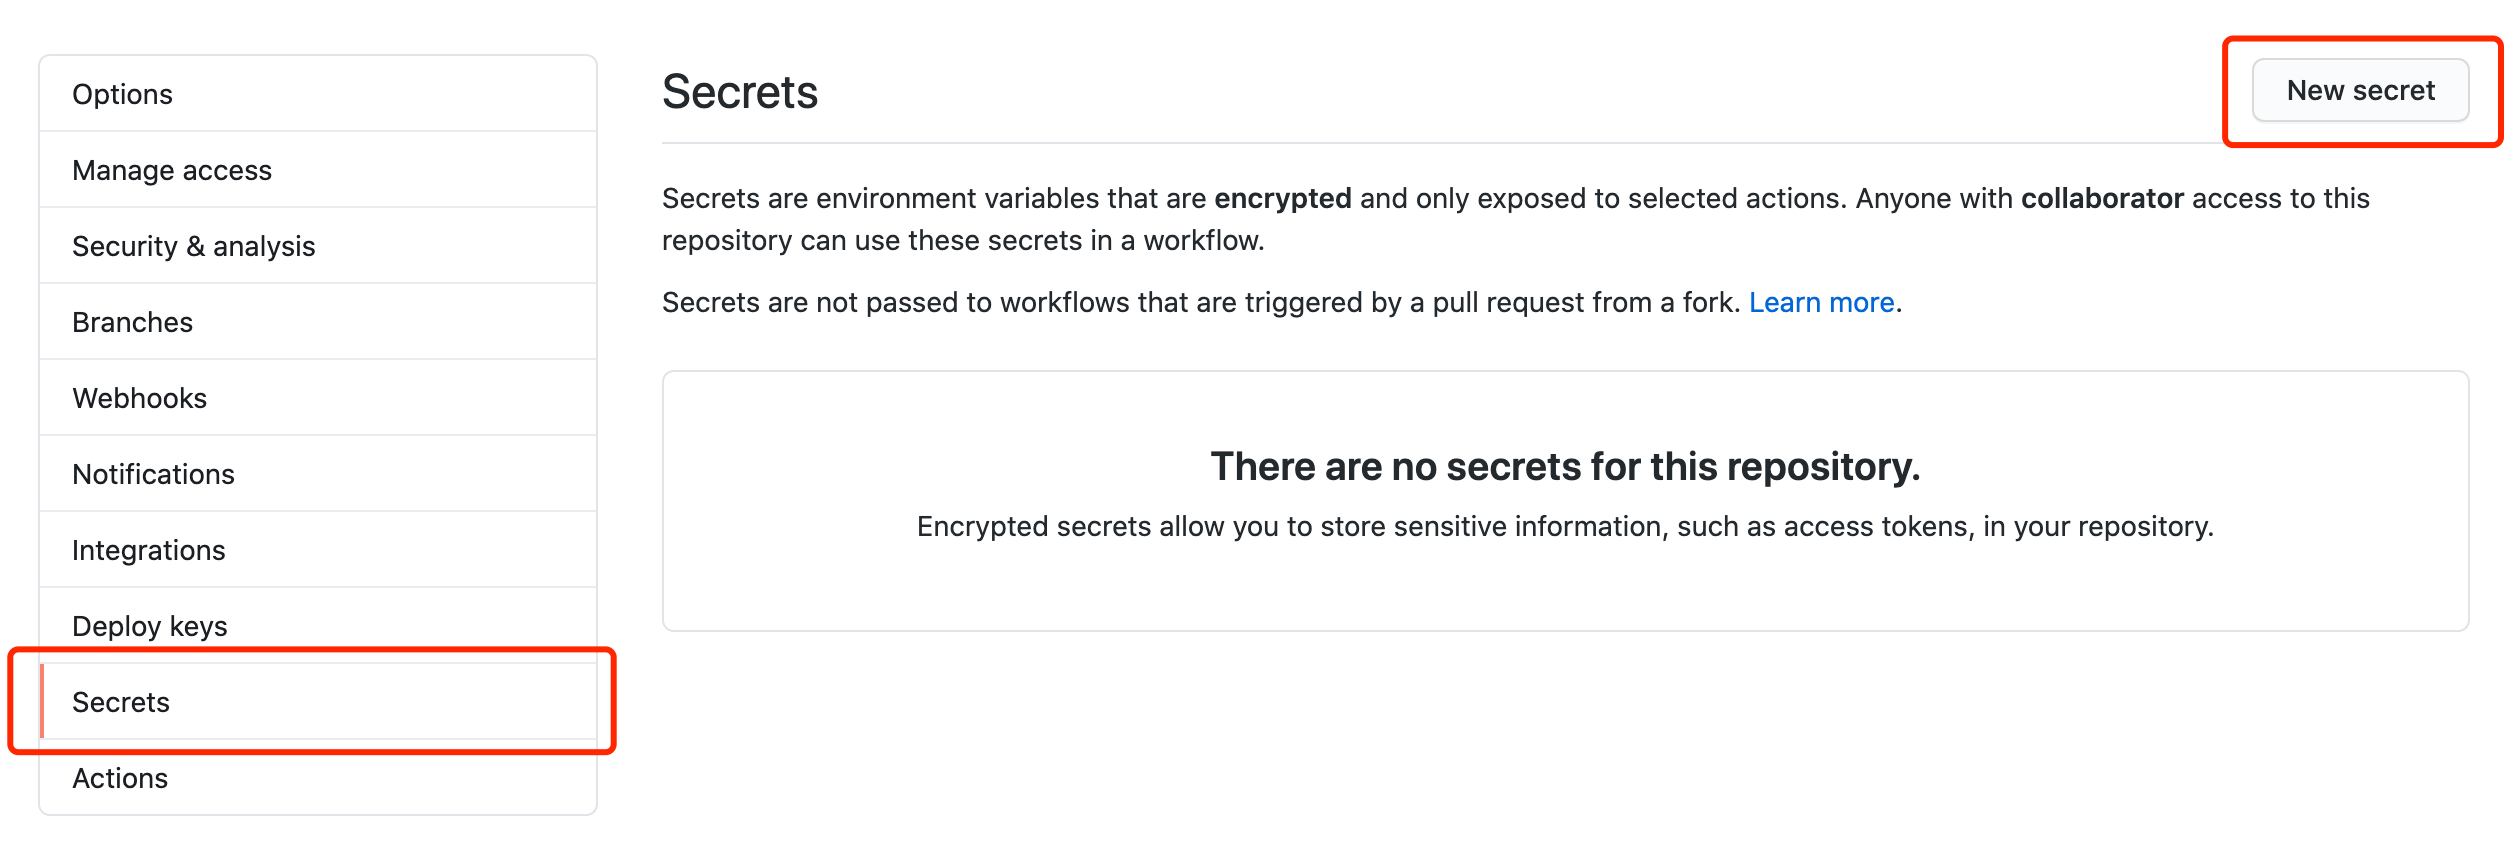
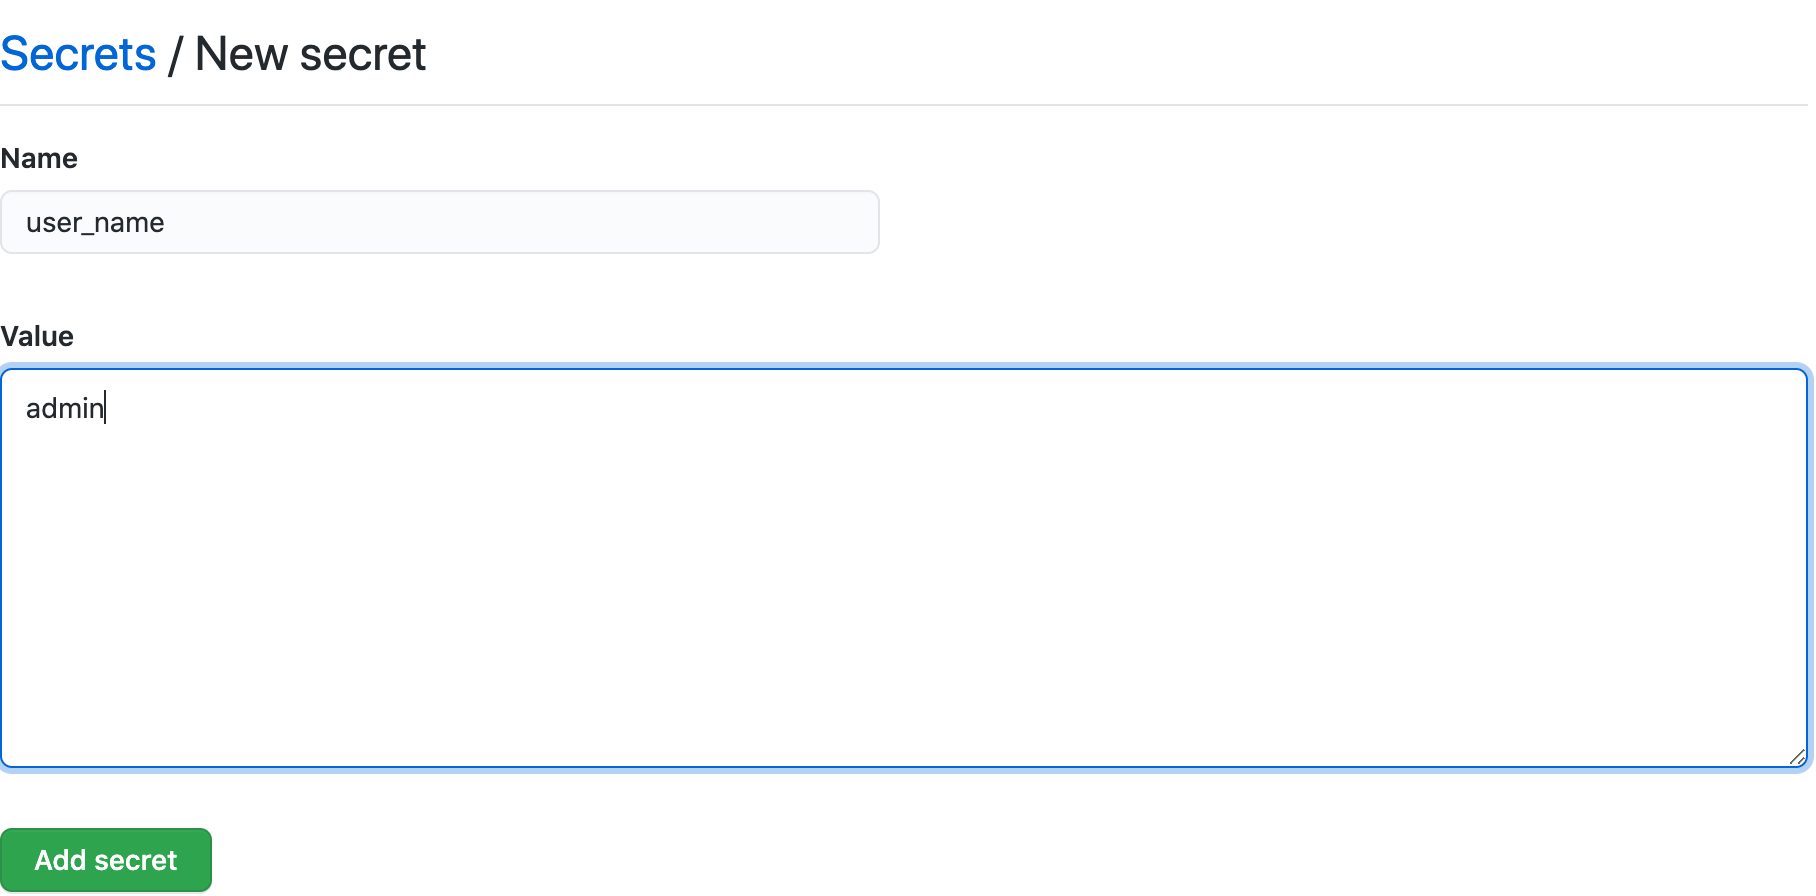

这里看到, 我们虽然用的是小写, 但是实际上写入的时候会是大写, 这里需要注意一下
读取
这个读取的过程并不是在 js 代码中, 而是在 yml 中配置, 配置成 inputs 的值,既然需要值, 就需要对于的预配置, 然后通过 ${{secrets.<VAR_NAME> }}的方式来获取
- 先定义一个选项以便于外部知道, 我们需要这个, 反应到项目中就是
action.yml
 1name: "Auto label"
 2description: "Automation generate label for issues."
 3author: "Caijinglong"
 4inputs:
 5  user_name:
 6    required: true
 7    description: "User name"
 8runs:
 9  using: "node12"
10  main: "dist/index.js"
-
配置 workflow:
.github/workflows/issue.yml1name: "On issue" 2on: 3 issues: 4 types: [opened, reopened, edited] 5jobs: 6 build: 7 runs-on: ubuntu-latest 8 steps: 9 - uses: actions/checkout@v2 10 - uses: ./ 11 with: 12 user_name: ${{ secrets.USER_NAME }}
测试下
1import * as core from "@actions/core";
2
3async function run(): Promise<void> {
4 try {
5 core.info(`Hello world`);
6 const username = core.getInput("user_name");
7 core.info(`Hello ${username}`);
8
9 core.info(`username === admin : ${username === "admin"}`);
10 } catch (error) {
11 core.setFailed(error.message);
12 }
13}
14
15run();
经常 push, 老要修改东西, 很麻烦, 简单些个推送脚本
1touch push.sh
2chmod +x push.sh
3echo "npm run all && git add . && git commit -m 'push with shell' && git push" > push.sh
4
5./push.sh
然后就是使用 open issue 的方式触发了

然后, 嗯, 结果是这样的, 这里的*** 就是被'安全化'过的, 鉴于我们 admin 是手输入的, 但是''碰巧''和 secret 里配置的一样, 所以一起被打码了, 然后, 结果是 true, 说明吧, 虽然这里被打码了, 但是并不影响真实的运行结果
前面简单的入门配置都完成了, 接下来简单的实战一下
实战
本篇的 action 项目是自动根据 issue 标题决定添加 issue label
使用 github api
学习下如何使用 api, 这里使用@actions/github提供的能力
1import * as github from '@actions/github'
2
3...
4core.info(`event name = ${github.context.eventName}`)
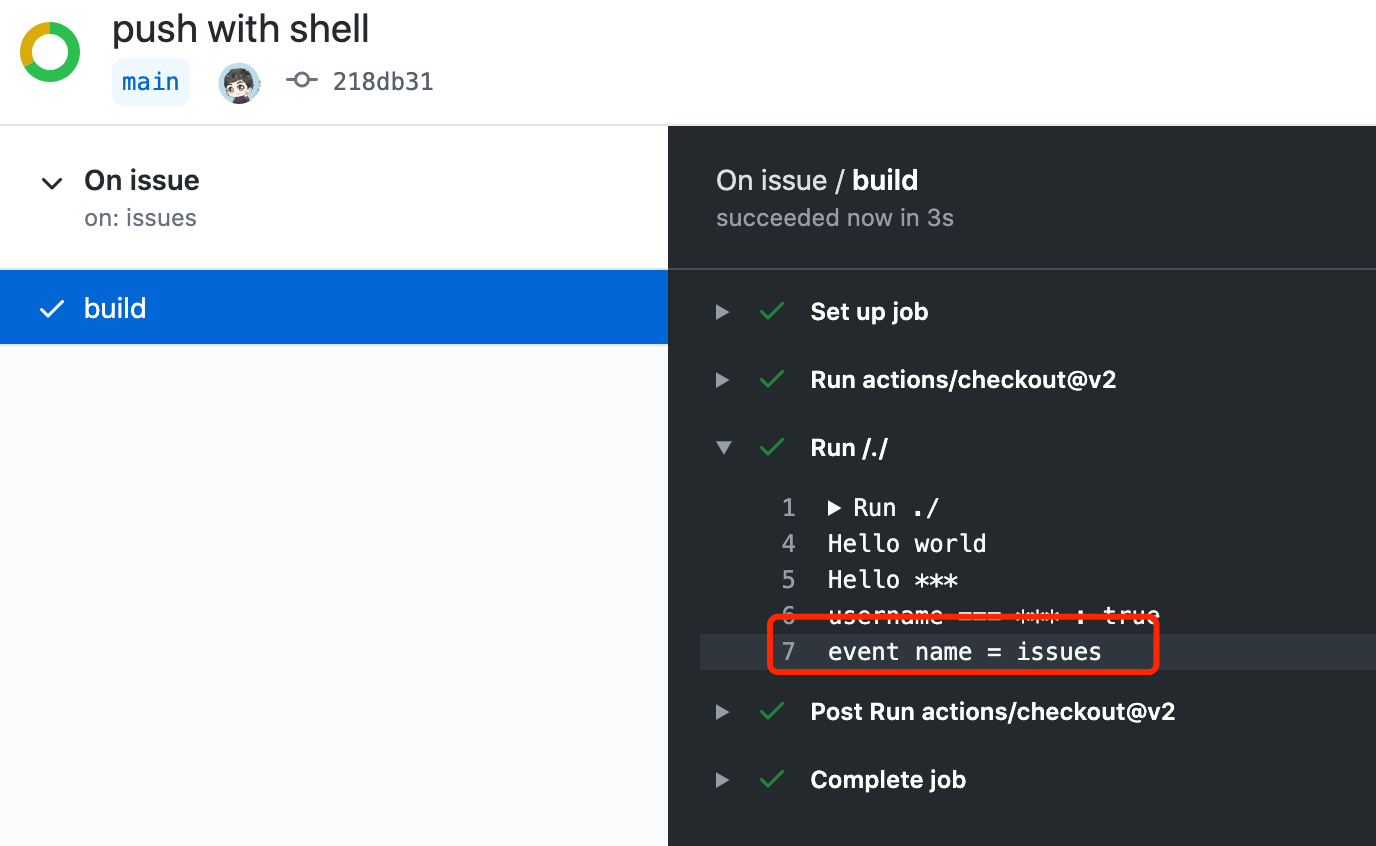
结果就是这样
github 配置 label
先思考步骤
- 获取所有的 label
- 匹配 issue 标题, 使用正则获取开头的
[]内的内容如[bug]标题的, 自动标注 bug label, feature/feature request 之类的自动标注 feature, 有就创建, 没有就不管
核心代码:
1import * as core from "@actions/core";
2import * as github from "@actions/github";
3import * as Webhooks from "@octokit/webhooks";
4
5export async function run(githubToken: string): Promise<void> {
6 try {
7 if (github.context.eventName !== "issues") {
8 core.info(
9 `目前仅支持 issues 触发, 你的类型是${github.context.eventName}`
10 );
11 return;
12 }
13 core.info(`The run token = '${githubToken}'`);
14
15 const payload = github.context
16 .payload as Webhooks.EventPayloads.WebhookPayloadIssues;
17
18 core.info(`Hello world`);
19 const username = core.getInput("user_name");
20 core.info(`Hello ${username}`);
21
22 core.info(`username === admin : ${username === "admin"}`);
23
24 core.info(`event name = ${github.context.eventName}`);
25
26 const octokit = github.getOctokit(githubToken);
27
28 const { owner, repo } = github.context.repo;
29 const issue_number = payload.issue.number;
30 const regex = /\[([^\]]+)\]/g;
31 const array = regex.exec(payload.issue.title);
32
33 core.info(
34 `触发的issue : owner: ${owner}, repo = ${repo}, issue_number = ${issue_number}`
35 );
36
37 if (array == null) {
38 core.info(`没有找到标签, 回复一下`);
39 await octokit.issues.createComment({
40 owner,
41 repo,
42 issue_number,
43 body: `没有找到[xxx]类型的标签`,
44 });
45 return;
46 }
47
48 const labelName = array[1];
49 core.info(`预计的标签名: labelname is = ${labelName}`);
50
51 const allLabels = await octokit.issues.listLabelsForRepo({
52 owner,
53 repo,
54 });
55
56 const labelText = allLabels.data
57 .map<string>((data) => {
58 return data.name;
59 })
60 .join(",");
61
62 core.info(`找到了一堆标签 ${labelText}`);
63
64 let haveResult = false;
65
66 for (const label of allLabels.data) {
67 const labels = [label.name];
68 if (labelName.toUpperCase() === label.name.toUpperCase()) {
69 core.info("找到了标签, 标上");
70 await octokit.issues.addLabels({
71 owner,
72 repo,
73 issue_number,
74 labels,
75 });
76 haveResult = true;
77 break;
78 }
79 }
80
81 if (!haveResult) {
82 core.info(
83 `没找到标签 ${labelName}, 回复下, 可能是新问题, 现在先短暂回复一下`
84 );
85 await octokit.issues.createComment({
86 owner,
87 repo,
88 issue_number,
89 body: `没有找到 ${labelName}`,
90 });
91 }
92
93 core.info("run success");
94 } catch (error) {
95 core.error("The action run error:");
96 core.error(error);
97 core.setFailed(error.message);
98 }
99}
配置文件
 1name: "On issue"
 2on:
 3  issues:
 4    types: [opened, reopened, edited]
 5jobs:
 6  build:
 7    runs-on: ubuntu-latest
 8    steps:
 9      - uses: actions/checkout@v2
10      - uses: ./
11        with:
12          user_name: ${{ secrets.USER_NAME }}
13 github-token: ${{ secrets.GITHUB_TOKEN }}
在编译上传后看一下
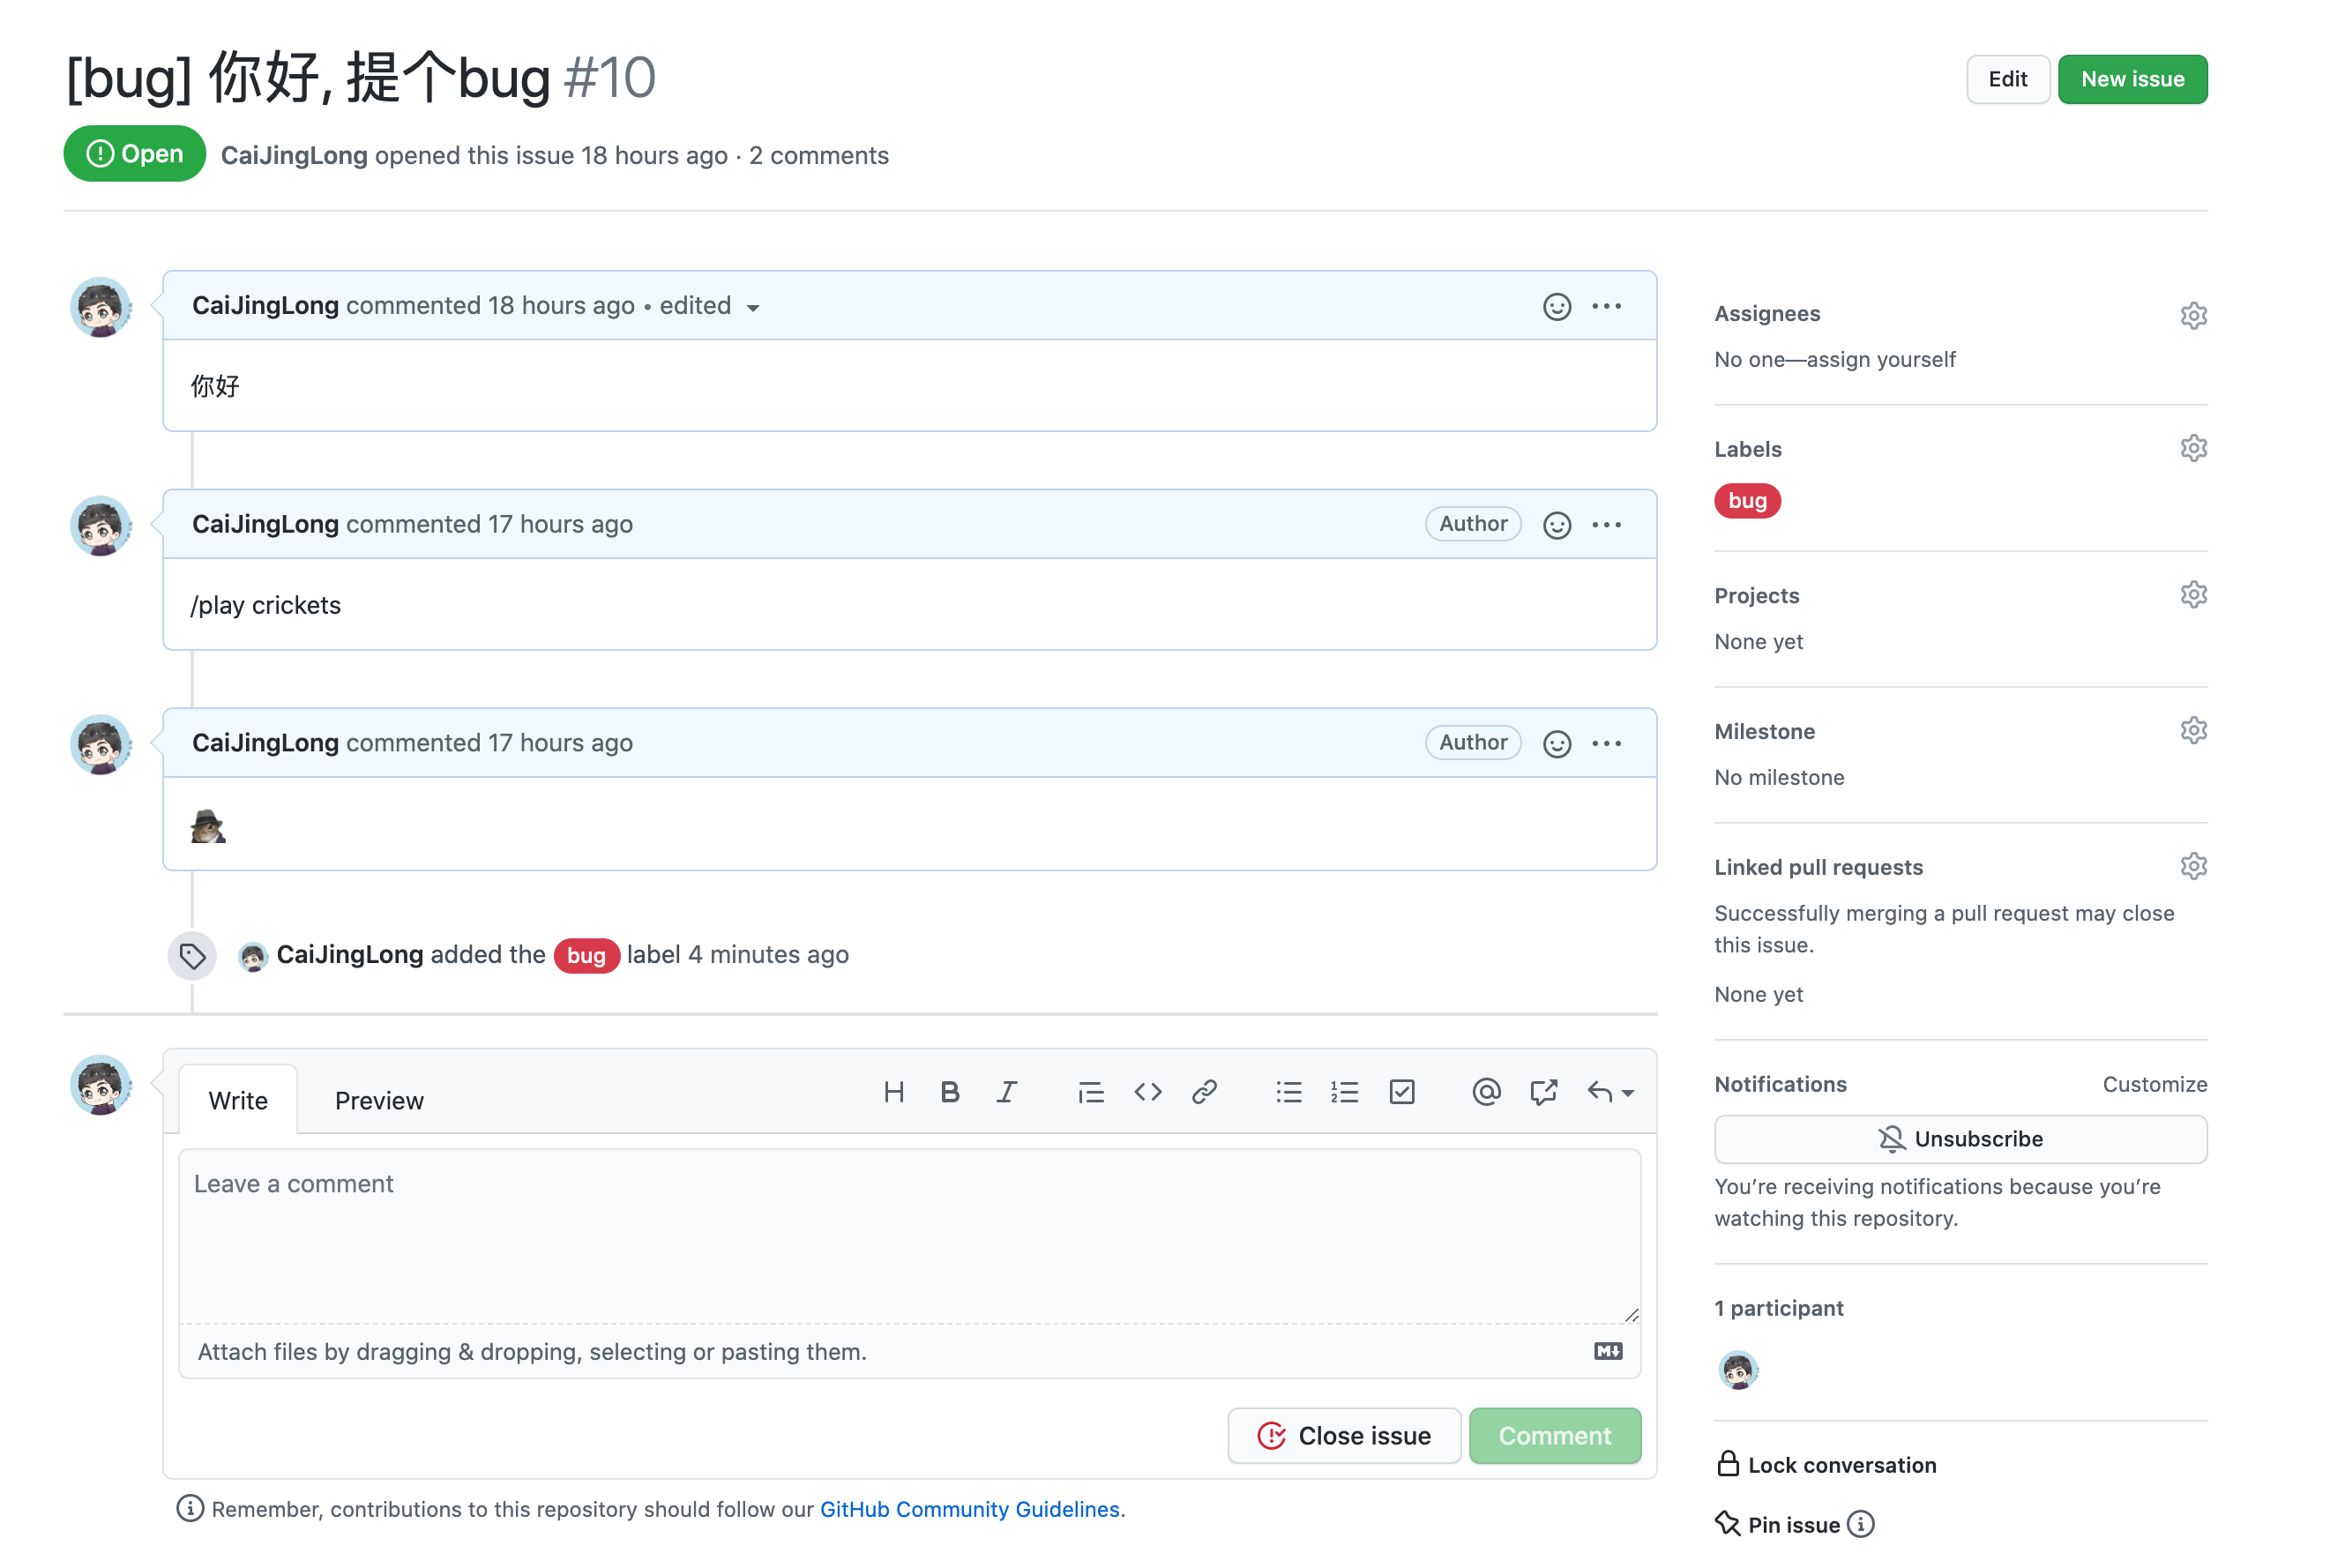
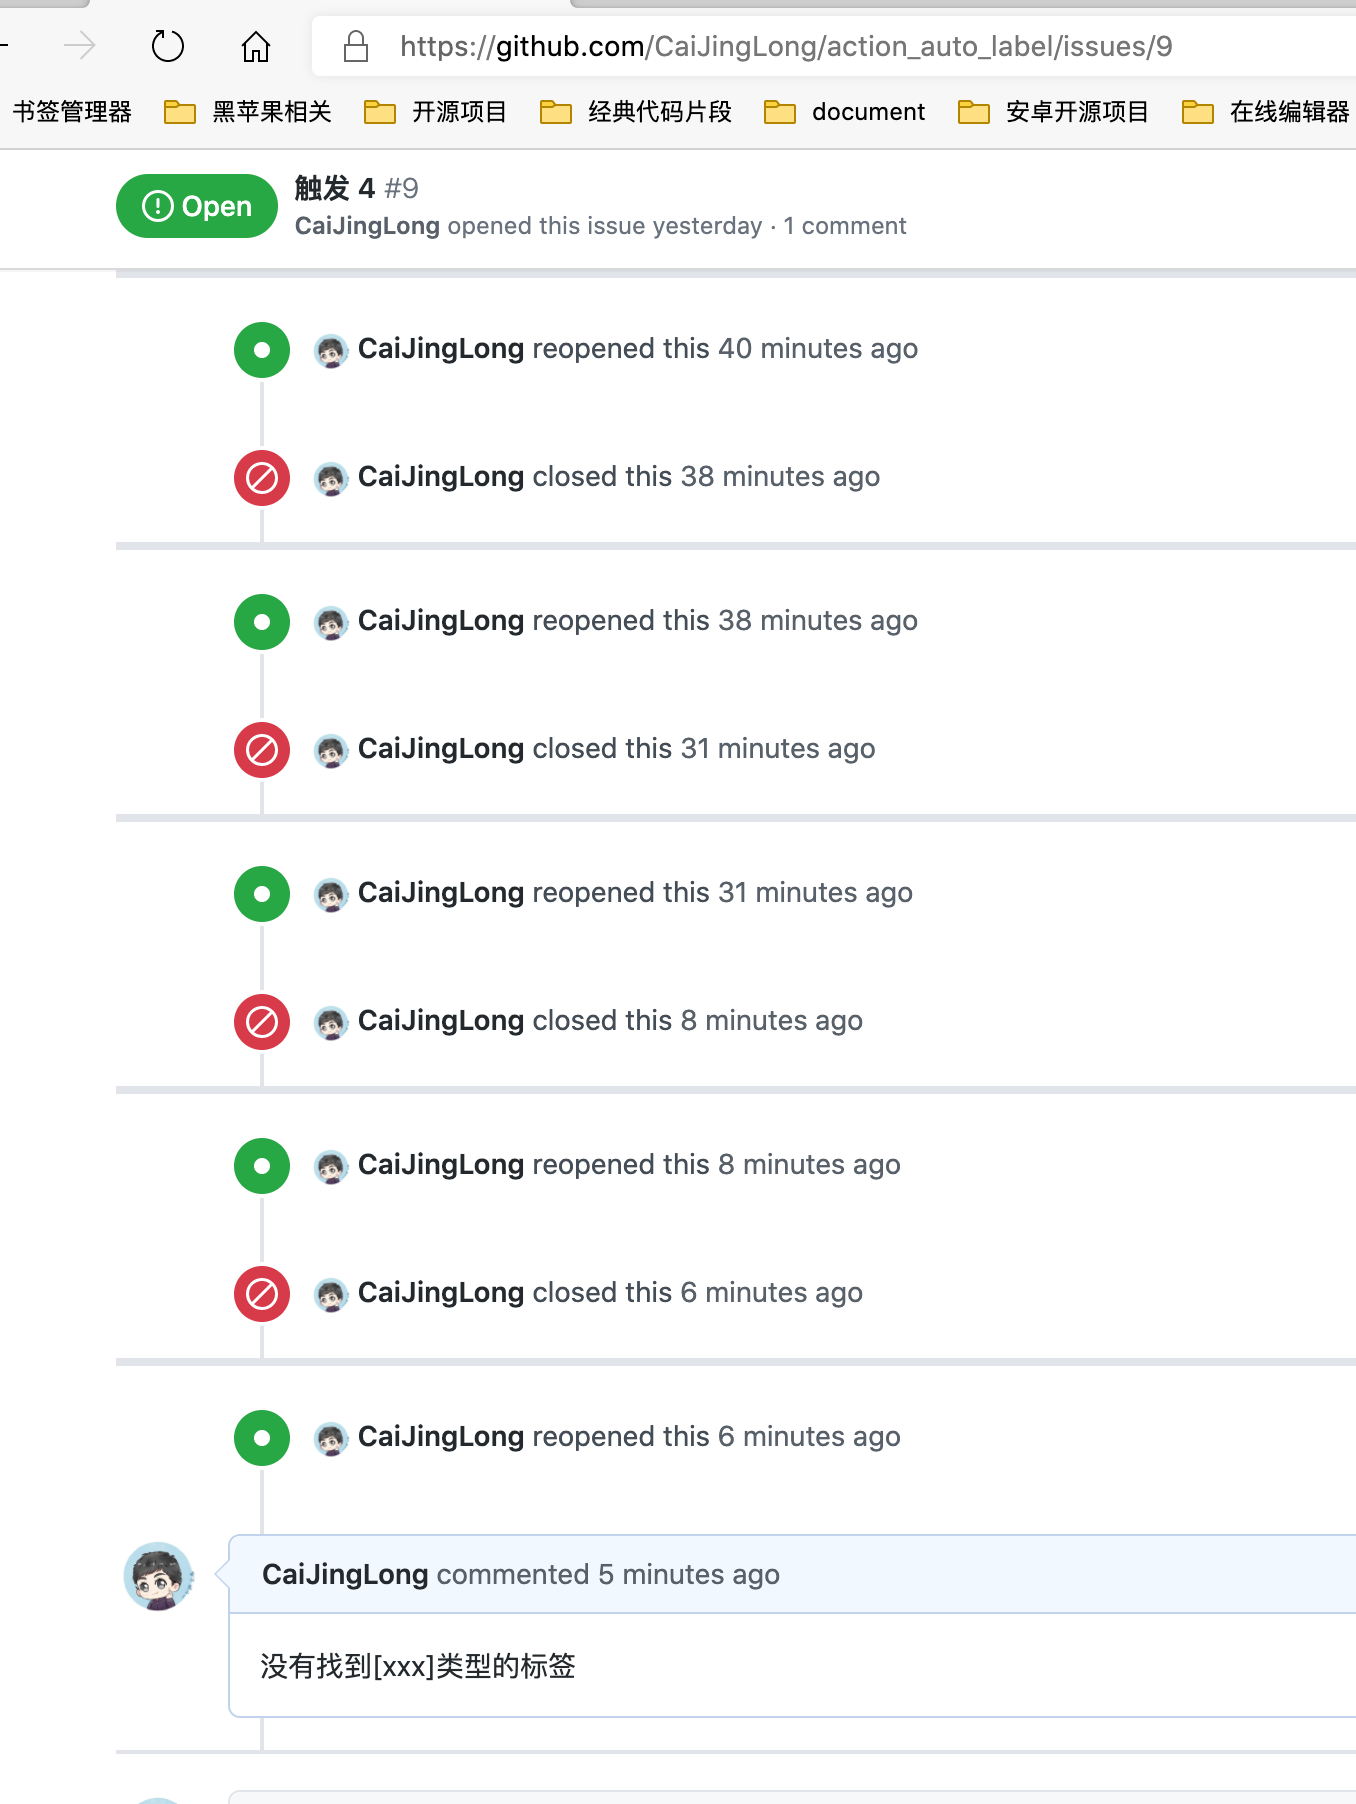
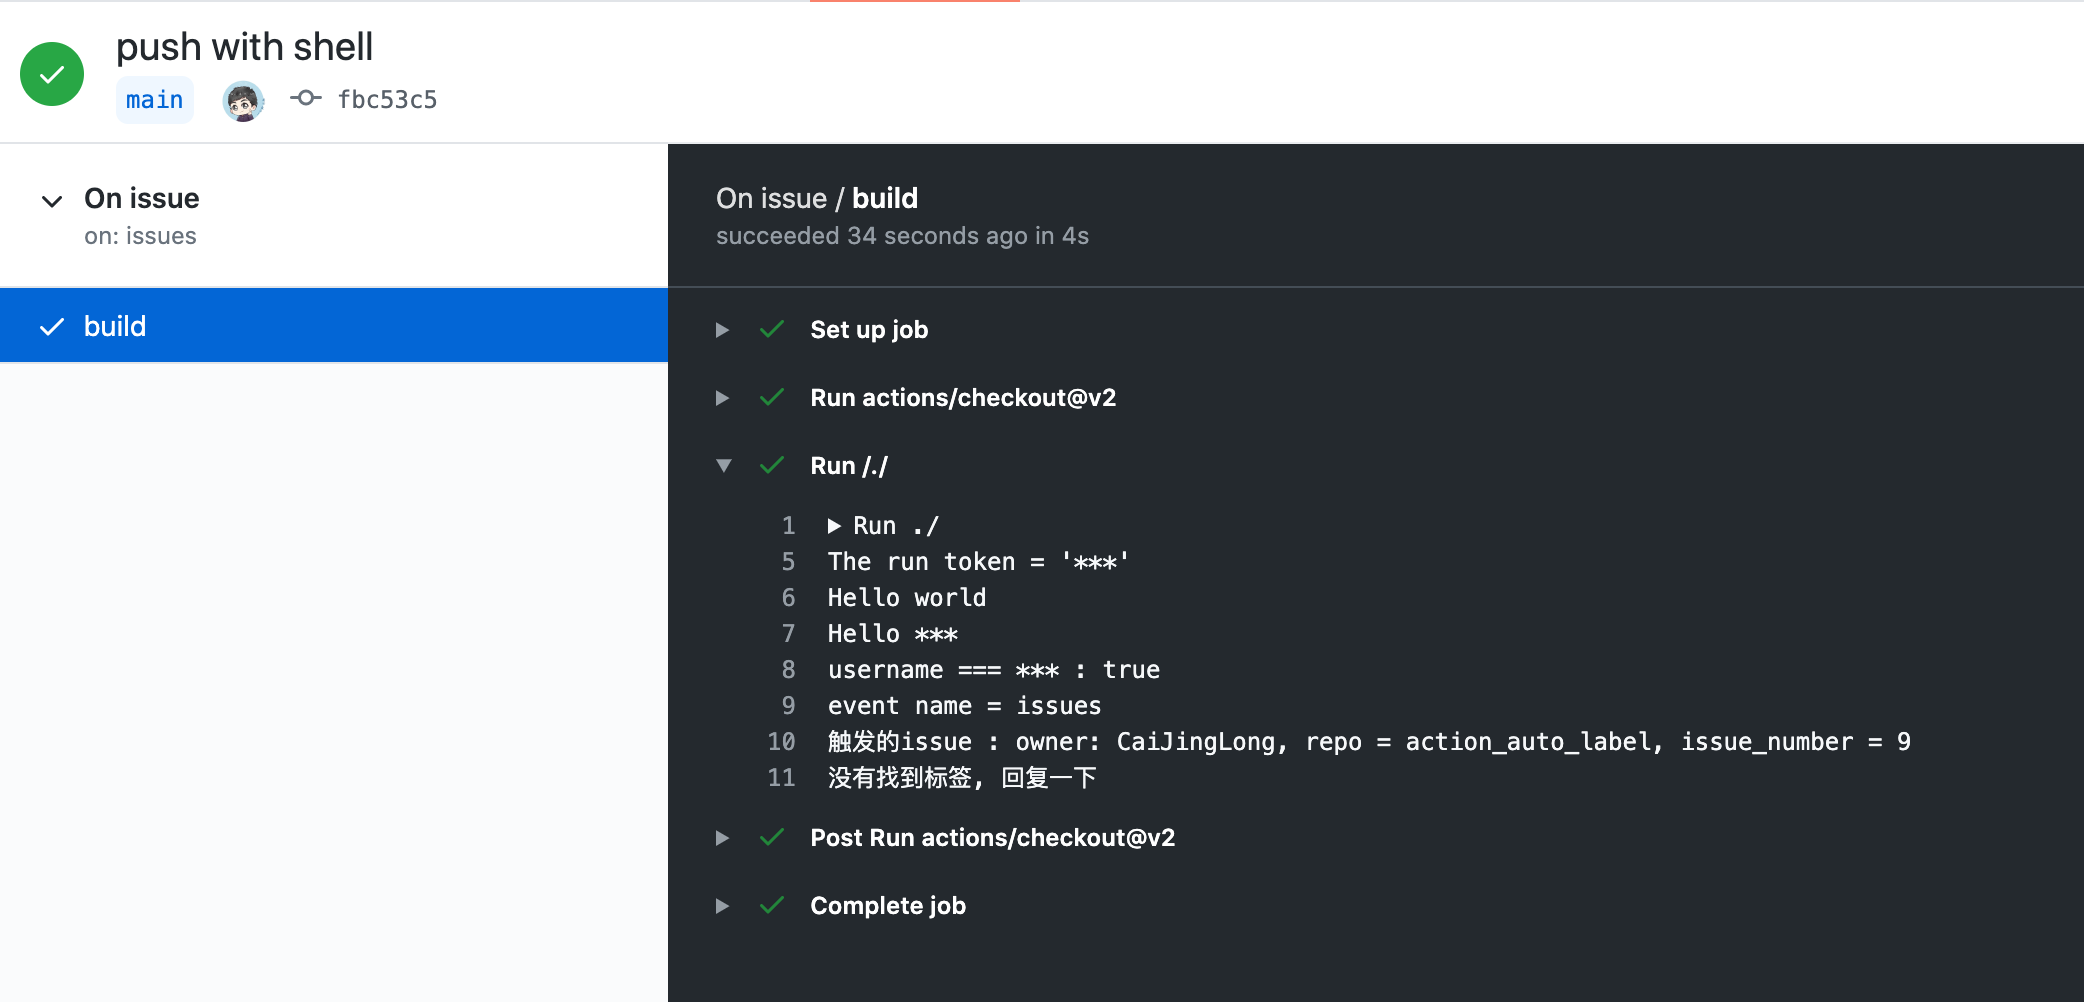
在经过调试后, 达到了预期的效果, 找到了就标记上, 没有就不标
也就是说, 在经历过这些以后, 就可以简单的达到我们的目的,后续的话, 可以根据需求扩展功能, 目前的瑕疵是, 部分功能调试起来并不方便
在实际使用时为了单元测试的方便, 可以封装的更加细一些. 比如: 把,github token, issue, repo, owner, title 等参数全部抽出去, 以便于本地测试是否真的有用
发布
写完了, 要发布了, 也就是让别人可以在 action 商店 里搜到你的作品
一般来讲有如下三个步骤
- 写 README
- 打 tag/release
- 发布到 action 商店里
最终的文件样式
 1.
 2├── LICENSE
 3├── README.md
 4├── __tests__/
 5│   └── main.test.ts
 6├── action.yml
 7├── dist/
 8│   ├── index.js
 9│   ├── index.js.map
10│   ├── licenses.txt
11│   └── sourcemap-register.js
12├── jest.config.js
13├── lib/
14│   ├── handle.js
15│   ├── main.js
16│   └── wait.js
17├── package-lock.json
18├── package.json
19├── push.sh*
20├── src/
21│   ├── handle.ts
22│   ├── main.ts
23│   └── wait.ts
24└── tsconfig.json
编写 README
这个就不展开说了, 抄一下别人的, 然后自己随便搞搞
打 tag
直接使用 github web 端的 release 功能, 这样可以同时完成 tag 和 release 的, 一般来说, action 比较常见的是 1 位长度的 action, 我们直接打一个 v1.0.0, 然后使用者的话, 一般使用 xxx@v1 就可以了
比如最常用的 actions/checkout, 目前最新 release 版本是v2.3.2, 但是你可以直接使用@v2 来使用一样
, 使用时可以接受诸如v1 v1.0.0 commitHash, master 这样的标记, 但, 一般不建议使用@master
发布吧
网址在这
, 选中你的 action, 这个名字是你定义在action.yml里的
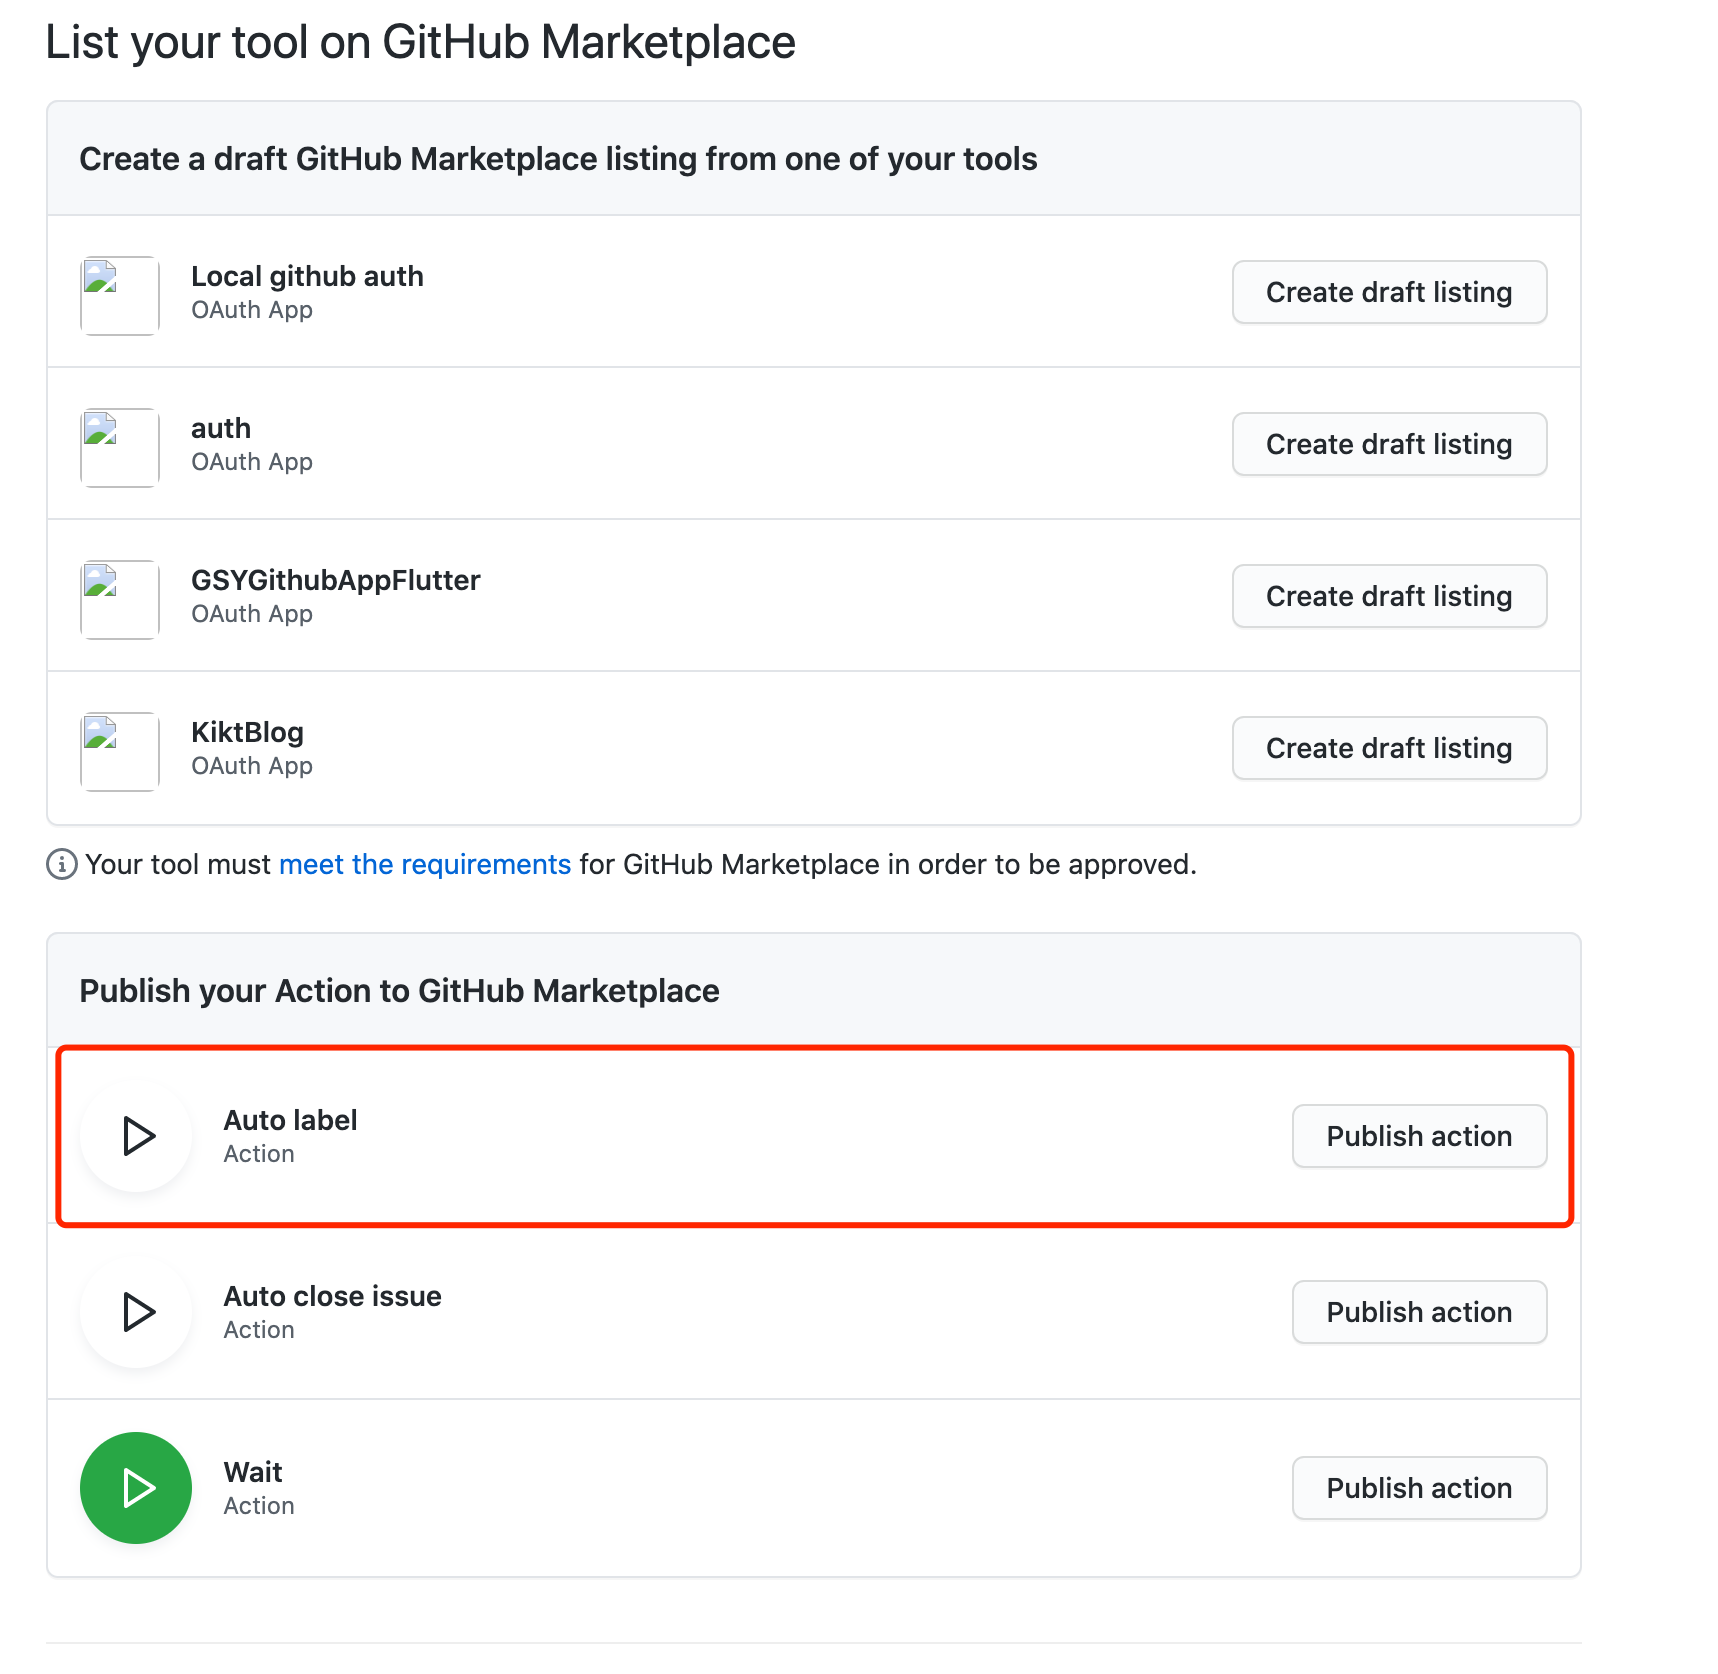
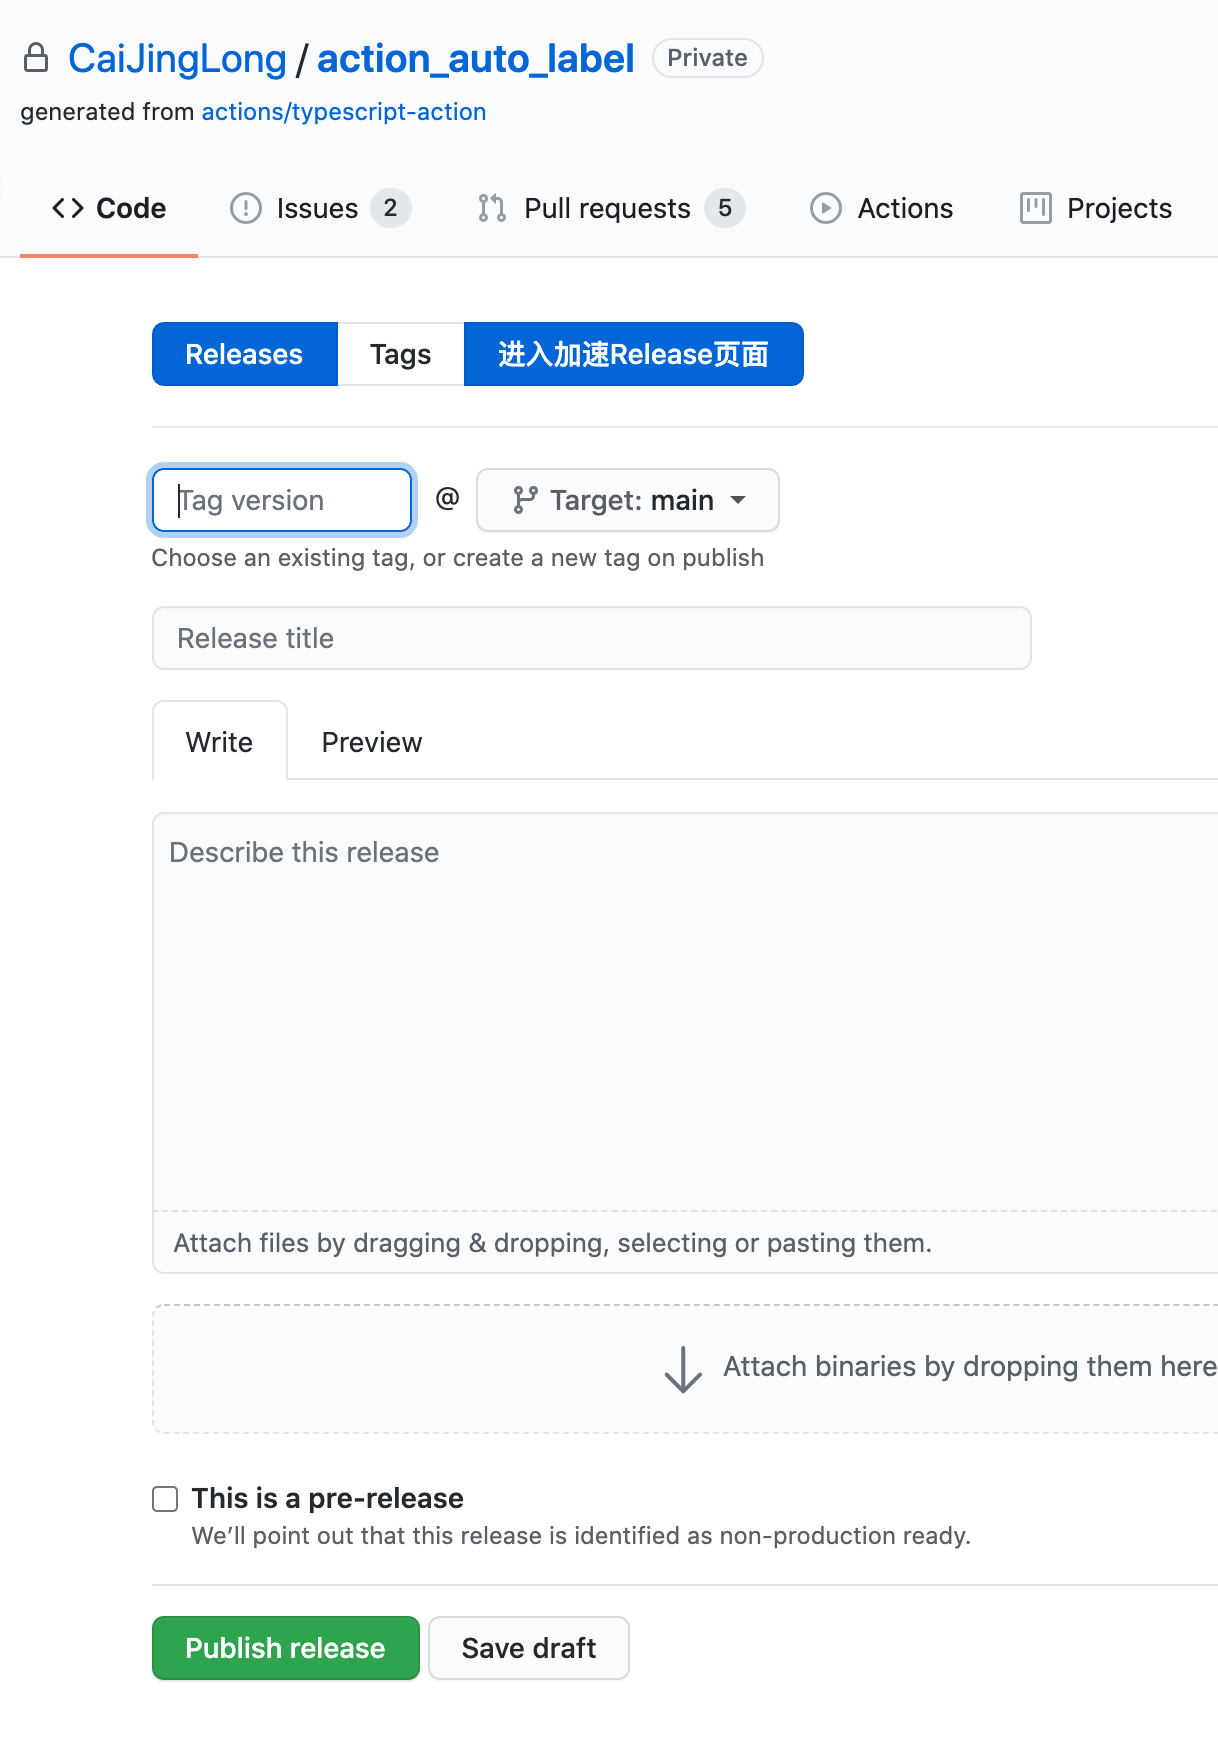
提示, 需要 release, 这里就来一个 v1.0.0 吧
当公开仓库后, 就可以看到这里多了一个 release action 的选项
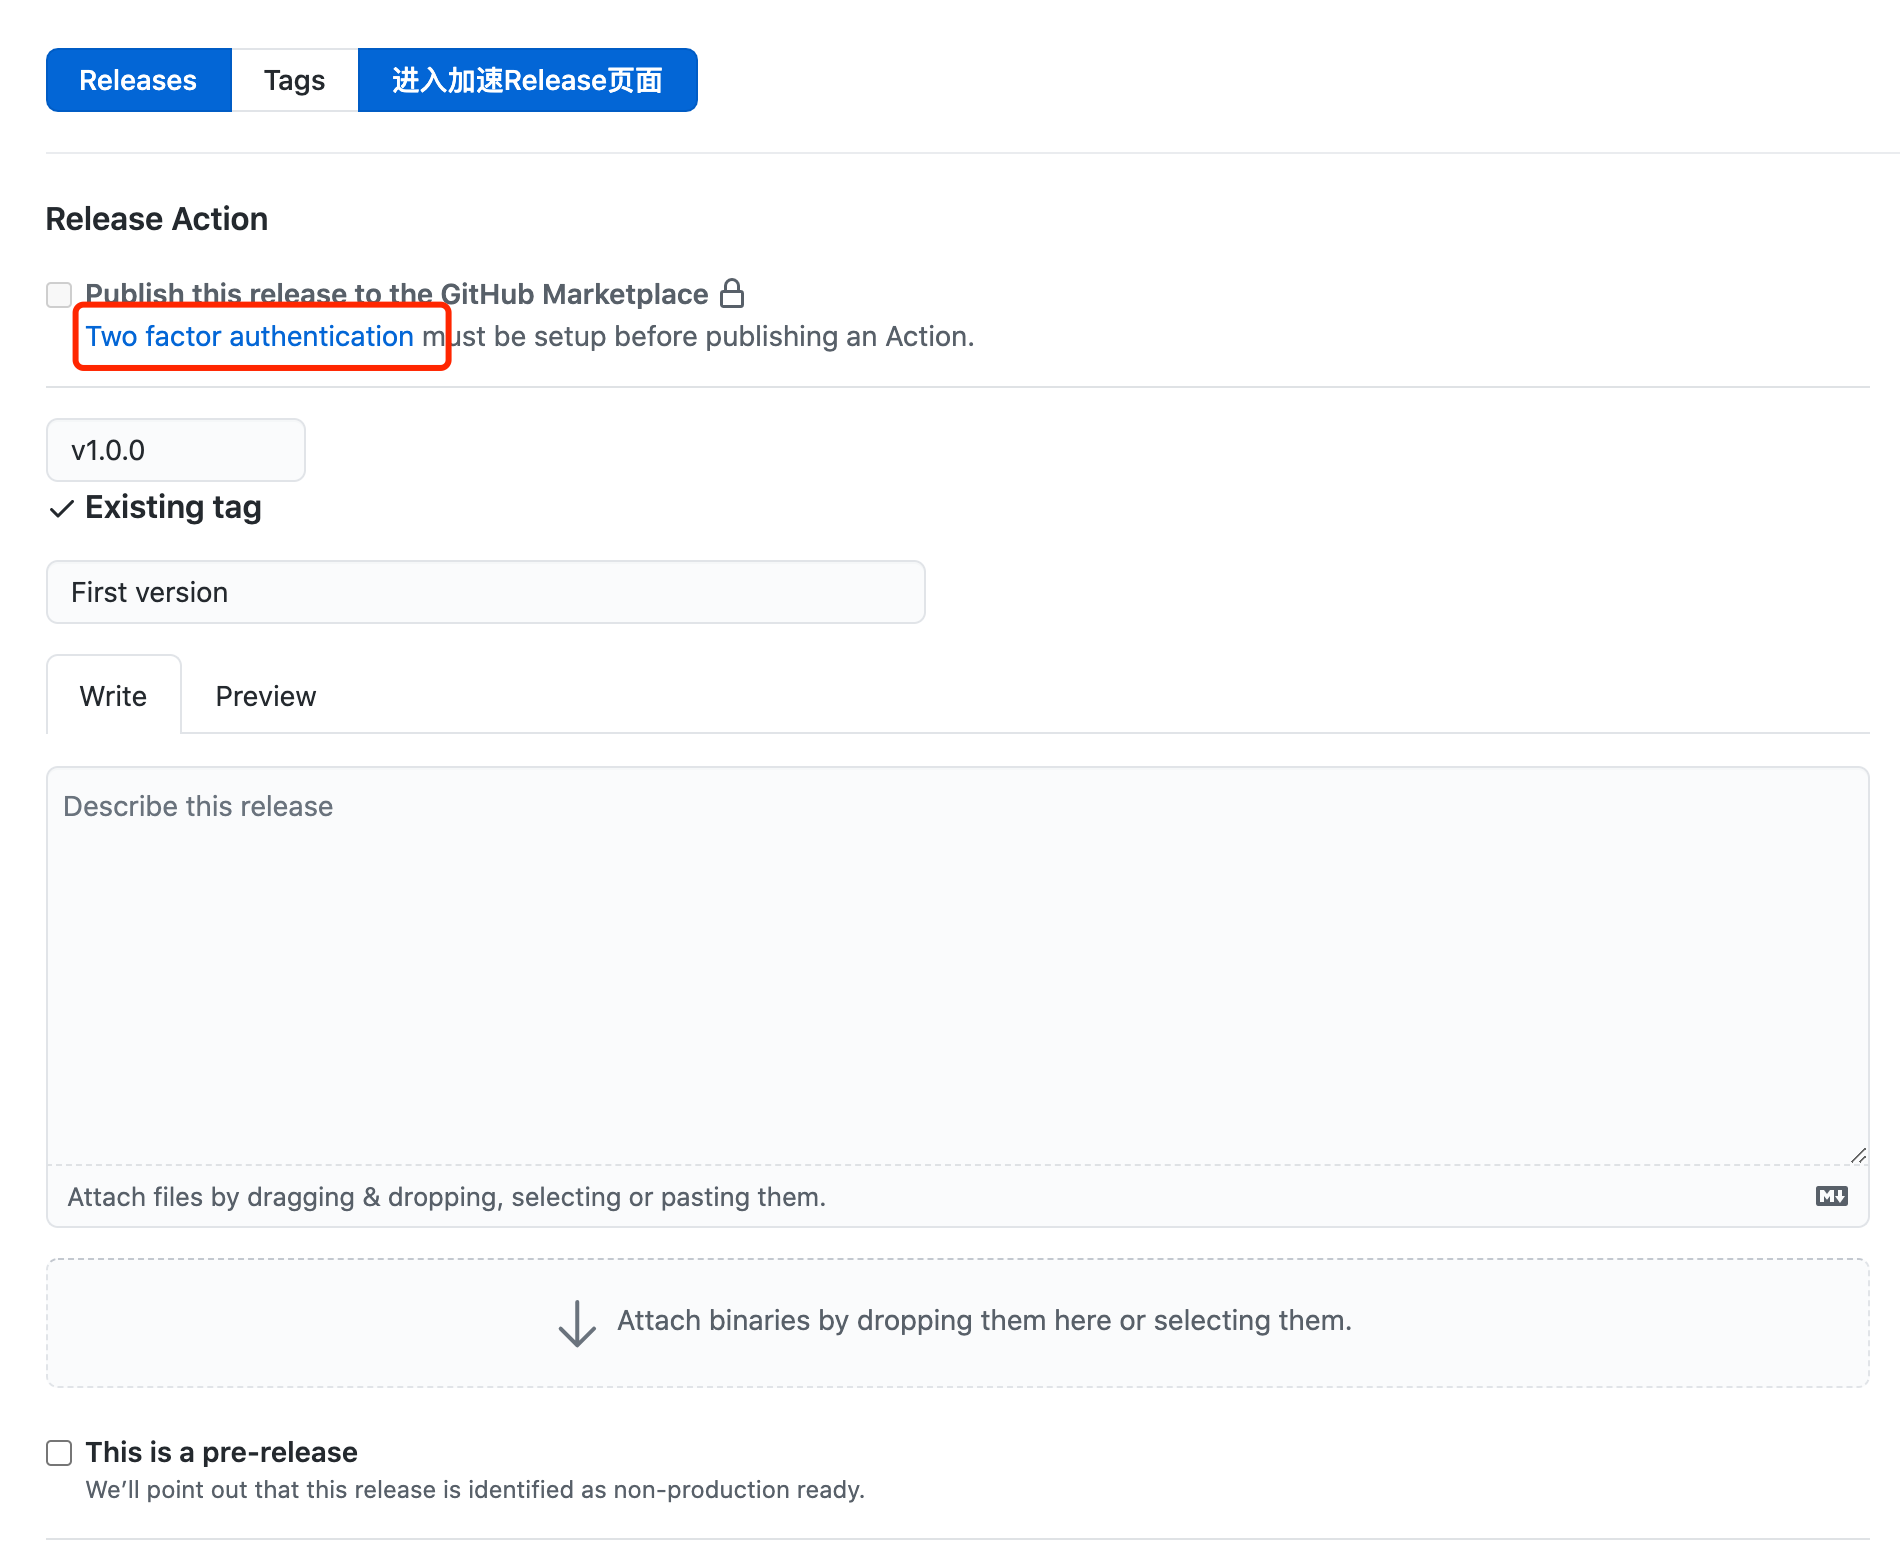
然后, 如果你是第一次使用, 可能有两个额外步骤
- 发布的协议
- 要求必须开启两步验证, 我这里使用 authy , 你可以使用别的任何 github 支持的工具, 具体的过程可以百度一下
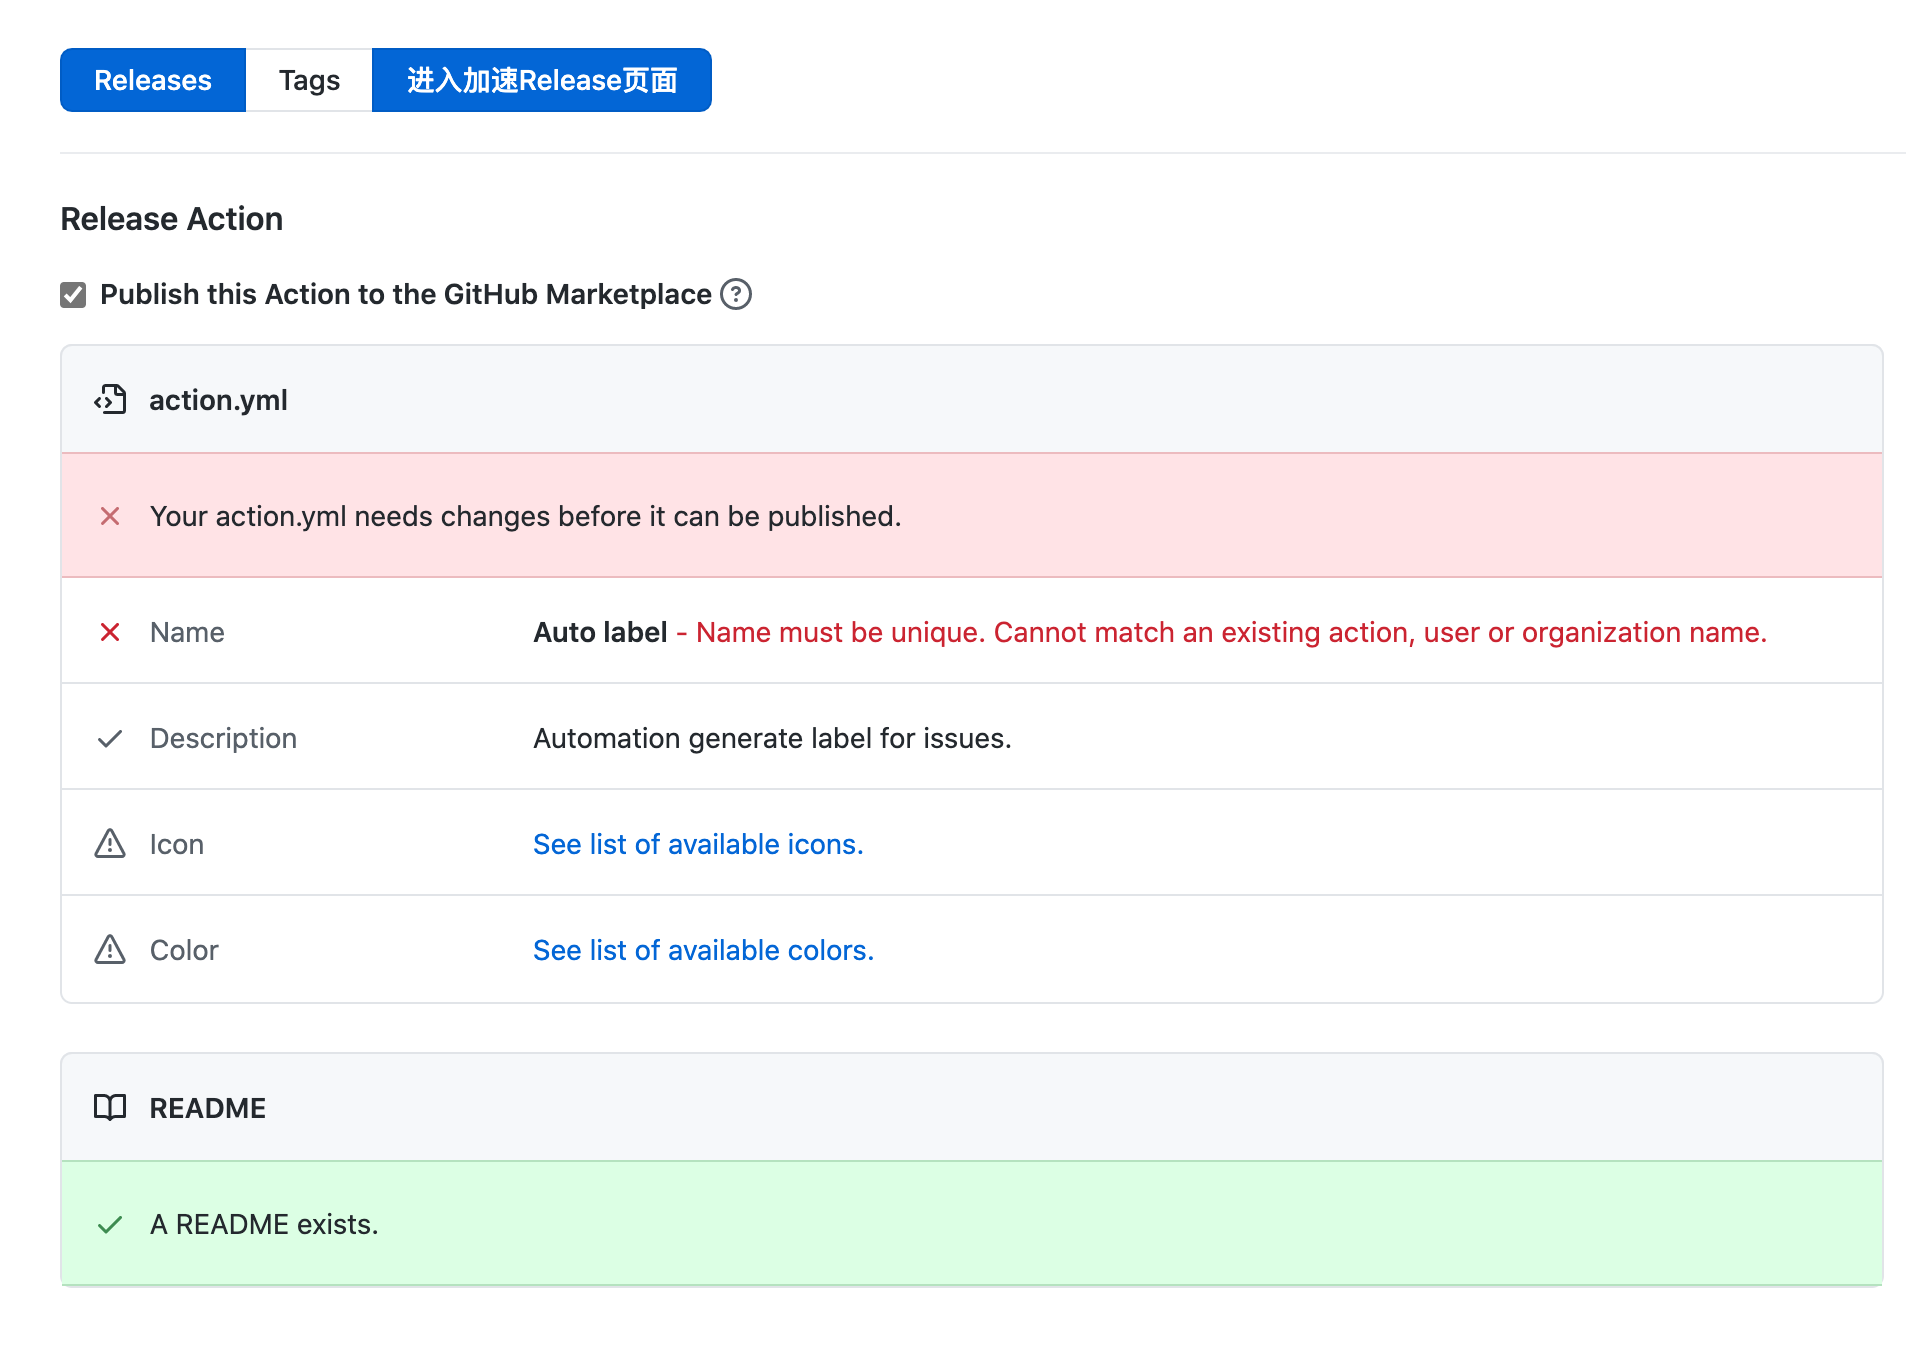
提示重名了, 我们修改一下 action.yml , 接着就可以用了
后记
本篇结合了 github 文档和模板完成了 github action 的创建, 使用, 调用的过程 仓库