Poi解析对比excel表格
文章目录
前言
这次不是 Android 的技术分享,是 java 的,当然把 poi 的代码放到 Android 中也可以用,毕竟同源嘛
为啥会有这个文章呢,因为我老婆是会计嘛,她有时候会让我帮忙对账,两个 excel 文件,顺序也不同,需要我来对比出哪里有问题,也就是数不太对应,我想了一下,如果好几百个甚至几千个数字来对账,那我岂不是眼睛都花了,这样我哪里还有时间去happy愉快的撸代码了?
作为一个程序员,我们要解放自己的眼睛,去做一些有意义的事情!
开发环境
Intellij Idea+maven
pom 文件
 1<?xml version="1.0" encoding="UTF-8"?>
 2<project xmlns="http://maven.apache.org/POM/4.0.0"
 3         xmlns:xsi="http://www.w3.org/2001/XMLSchema-instance"
 4         xsi:schemaLocation="http://maven.apache.org/POM/4.0.0 http://maven.apache.org/xsd/maven-4.0.0.xsd">
 5    <modelVersion>4.0.0</modelVersion>
 6
 7    <groupId>com.kikt</groupId>
 8    <artifactId>ExcelDemo</artifactId>
 9    <version>1.0-SNAPSHOT</version>
10    <build>
11        <plugins>
12            <plugin>
13                <groupId>org.apache.maven.plugins</groupId>
14                <artifactId>maven-compiler-plugin</artifactId>
15                <configuration>
16                    <source>1.7</source>
17                    <target>1.7</target>
18                </configuration>
19            </plugin>
20        </plugins>
21    </build>
22
23    <dependencies>
24        <!-- https://mvnrepository.com/artifact/org.apache.poi/poi -->
25        <dependency>
26            <groupId>org.apache.poi</groupId>
27            <artifactId>poi</artifactId>
28            <version>3.15-beta2</version>
29        </dependency>
30        <!-- https://mvnrepository.com/artifact/org.apache.poi/poi-ooxml -->
31        <dependency>
32            <groupId>org.apache.poi</groupId>
33            <artifactId>poi-ooxml</artifactId>
34            <version>3.15-beta2</version>
35        </dependency>
36    </dependencies>
37
38</project>
引入了 poi 的解析库的两个文件
结构
首先是 poi 对于 excel 的结构分析 WorkBook->Sheet->Row->Cell 放在 wps/excel 中看,WorkBook 对应的是工作簿,Sheet 是表,Row 顾名思义是行,Cell 是单元格
有了这个基础,我们继续去看
获取数据
得到 sheet 表
要想拿到数据,首先需要先把工作簿拿到,然后拿到 Sheet
首先拿到 WorkBook
1File file = new File(path);
2FileInputStream is = new FileInputStream(file);
3Workbook sheets = WorkbookFactory.create(is);
这里 path 是文件对应的路径
我们这里建一个 Utils 文件用于操作这样的重复数据 ExcelUtils.java
 1public class ExcelUtils {
 2    private ExcelUtils() {
 3    }
 4    public static Sheet getSheet(String path, int sheetPosition) throws IOException, InvalidFormatException {
 5        File file = new File(path);
 6        FileInputStream is = new FileInputStream(file);
 7        Workbook sheets = WorkbookFactory.create(is);
 8        return sheets.getSheetAt(sheetPosition);
 9    }
10
11    public static Sheet getSheet(String path, String sheetName) throws IOException, InvalidFormatException {
12        File file = new File(path);
13        FileInputStream is = new FileInputStream(file);
14        Workbook sheets = WorkbookFactory.create(is);
15        return sheets.getSheet(sheetName);
16    }
17}
两个方法分别使用表格的名字/序号获取 position 从 0 开始,这里为了处理有可能数十个 sheet 的情况,所以增加了一个用名称获取的方法
Sheet 的声明
1public interface Sheet extends Iterable<Row>
Sheet 是一个接口,继承 Iterable,所以可以知道这里的实现类一定实现了 Iterable 接口 可以用 foreach 循环来遍历 Sheet 得到 Row
得到 Cell
1public interface Row extends Iterable<Cell>
Row 同样如此,可以通过 foreach 循环得到 Cell,这样可以每个单元格的遍历
1 Cell getCell(int var1);
Row 中有一个方法,根据一个 int 值得到对应的 Cell 这个方法从 0 开始,这里就涉及到一个问题,Excel 的列标是字母形式,而不是数字,需要转化一下 这里写了一个小算法
 1    private static Map<Integer, Integer> columnMap = new HashMap<>();
 2
 3    private static int getColumnLength(int length) {
 4        Integer columnLength = columnMap.get(length);
 5        if (columnLength == null) {
 6            columnMap.put(length, (int) Math.pow(26, length));
 7        } else {
 8            return columnLength;
 9        }
10        return getColumnLength(length);
11    }
12
13    /**
14     * @param columnLetter 列的字母
15     * @return 列对应的数字
16     */
17    public static int getColumnNumber(String columnLetter) {
18        if (columnLetter == null) {
19            throw new RuntimeException("列号不能为空");
20        }
21        columnLetter = columnLetter.toLowerCase();
22        int letterLength = columnLetter.length();
23        if (letterLength == 1) {
24            char letter = columnLetter.charAt(0);
25            return letter - 97;
26        } else {
27            Integer length =getColumnLength(letterLength - 1);
28            return (getColumnNumber(columnLetter.charAt(0) + "")+1)*length+getColumnNumber(columnLetter.substring(1));
29        }
30    }
可以将 AA、CA 之类的列号转为对应的数字 PS:题外话,这里推荐下 Sedgewick 的《算法》一书,最近重新研读了下,虽然都是基础,但是基础的牢靠对于算法有很大的帮助
正式开始编码的准备工作
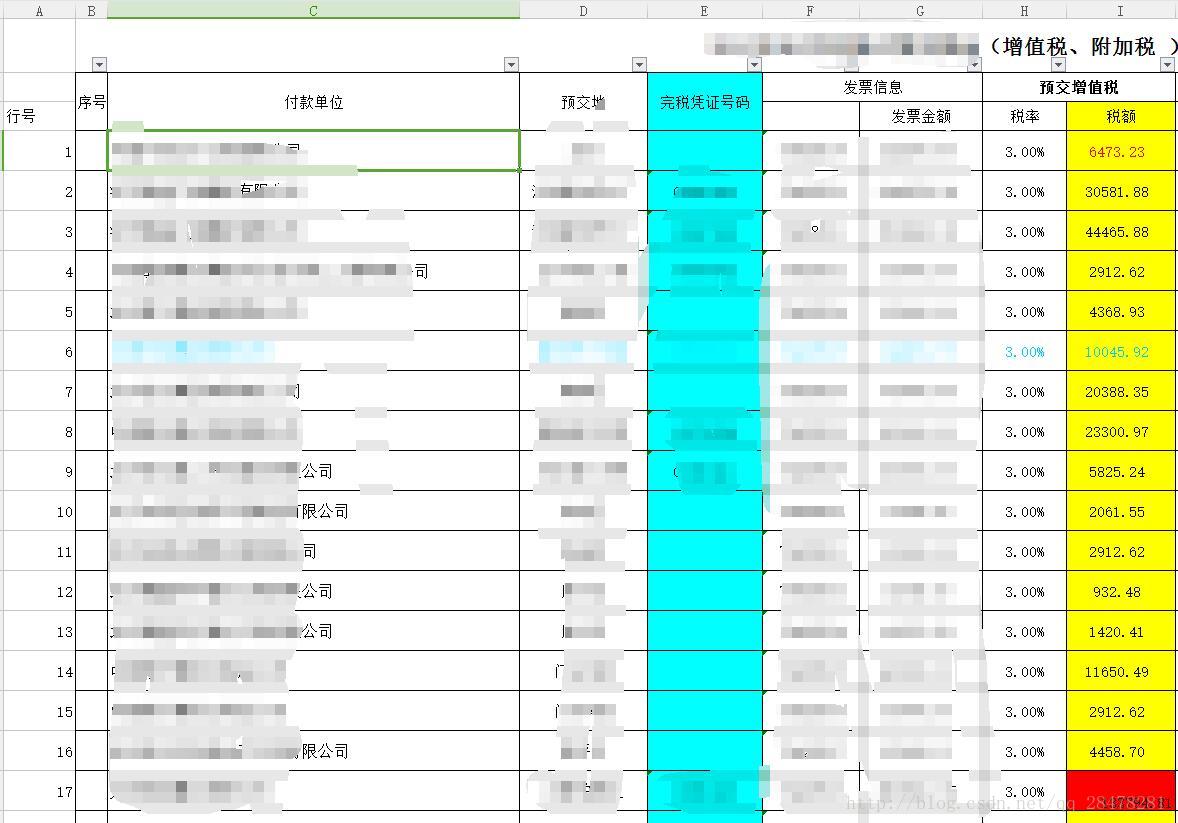
这里是对应的两个表的截图,这里我给隐私部位打了些马赛克
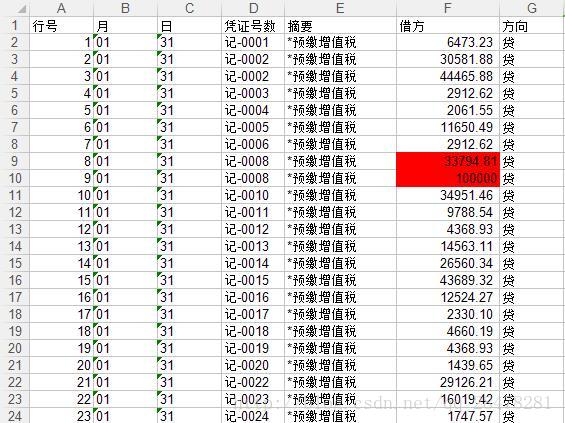
1    String recordFilePath = "H:\\1.xls";
2    Sheet recordSheet = ExcelUtils.getSheet(recordFilePath, 0);
3    List<RecordBean> recordBeanList = getRecordList(recordSheet, "a", "f");
4
5    String invoiceFilePath = "2.xls";
6    Sheet invoiceSheet = ExcelUtils.getSheet(invoiceFilePath, "外地预交增值税及附加税");
7    List<InvoiceBean> invoiceBeanList = getInvoiceList(invoiceSheet, "a", "i");
这里我首先通过 util 的方法获取到了 sheet 表,然后将需要解析的列号写入方法内 然后获取到了对应的 List 集合
bean 实体
 1package excel.bean;
 2
 3/**
 4 * Created by kikt on 2017/2/26.
 5 * 记账信息
 6 */
 7public class RecordBean  extends NumberBean{
 8    private int index;
 9    private double number;
10
11    public int getIndex() {
12        return index;
13    }
14
15    public void setIndex(int index) {
16        this.index = index;
17    }
18
19    public double getNumber() {
20        return number;
21    }
22
23    public void setNumber(double number) {
24        this.number = number;
25    }
26
27    @Override
28    public String toString() {
29        return "RecordBean{" +
30                "index=" + index +
31                ", number=" + number +
32                '}';
33    }
34}
 1package excel.bean;
 2
 3/**
 4 * Created by kikt on 2017/2/26.
 5 */
 6public class NumberBean {
 7    private int numberIndex;
 8
 9    public int getNumberIndex() {
10        return numberIndex;
11    }
12
13    public void setNumberIndex(int numberIndex) {
14        this.numberIndex = numberIndex;
15    }
16}
获取 list 的方法
 1private static List<RecordBean> getRecordList(Sheet recordSheet, String indexLetter, String numberLetter) {
 2        List<RecordBean> list = new ArrayList<>();
 3        for (Row cells : recordSheet) {
 4            RecordBean bean = new RecordBean();
 5            Cell indexCell = cells.getCell(ExcelUtils.getColumnNumber(indexLetter));
 6            if (indexCell == null || indexCell.getCellType() != Cell.CELL_TYPE_NUMERIC) {
 7                continue;
 8            }
 9            double numericCellValue = indexCell.getNumericCellValue();
10            bean.setIndex((int) numericCellValue);
11            int columnNumber = ExcelUtils.getColumnNumber(numberLetter);
12            bean.setNumberIndex(columnNumber);
13            bean.setNumber(cells.getCell(columnNumber).getNumericCellValue());
14            list.add(bean);
15        }
16
17        return list;
18    }
另一个大致相同,这里不贴了
然后通过一个 compare 方法比较一下
 1private static List<InvoiceBean> compareList(List<RecordBean> recordBeanList, List<InvoiceBean> invoiceBeanList) {
 2        List<InvoiceBean> unMarkBeanList = new ArrayList<>();
 3
 4        for (int i = recordBeanList.size() - 1; i >= 0; i--) {
 5            RecordBean recordBean = recordBeanList.get(i);
 6            for (int j = 0; j < invoiceBeanList.size(); j++) {
 7                InvoiceBean invoiceBean = invoiceBeanList.get(j);
 8                if (recordBean.getNumber() == invoiceBean.getNumber()) {
 9                    invoiceBeanList.remove(invoiceBean);
10                    recordBeanList.remove(recordBean);
11                    break;
12                }
13            }
14        }
15
16        unMarkBeanList.addAll(invoiceBeanList);
17
18        return unMarkBeanList;
19    }
将相同的移除掉,剩余的就是不同的
保存结果
这里光有比对结果不行,还需要修改表格,将不同的标记出来,以备人工查账
保存 sheet 的方法
 1 public static void saveWorkbook(String path, Workbook workbook) throws IOException {
 2        File file = new File(path);
 3        workbook.write(new FileOutputStream(file));
 4    }
 5
 6    public static void backupSheet(String path, Workbook workbook) throws IOException {
 7        File file = new File(path);
 8        String name = file.getName();
 9        String newPath = file.getParentFile().getAbsolutePath() + "\\backup\\";
10        String newName = newPath + name + "_" + TimeUtils.getTimeString() + ".bak";
11        File newFile = new File(newName);
12        newFile.getParentFile().mkdirs();
13        newFile.createNewFile();
14        workbook.write(new FileOutputStream(newFile));
15    }
16
17    public static void saveSheet(Sheet sheet, String path) throws IOException {
18        Workbook workbook = sheet.getWorkbook();
19        saveWorkbook(path, workbook);
20    }
 1package excel.utils;
 2
 3import java.text.SimpleDateFormat;
 4import java.util.Date;
 5
 6/**
 7 * Created by kikt on 2017/2/26.
 8 */
 9public class TimeUtils {
10
11}public static String getTimeString() {
12    SimpleDateFormat sdf = new SimpleDateFormat("yyyyMMdd_HHmmss");
13    return sdf.format(new Date());
14}
核心保存的方法是 workbook.write(OutputStream)方法,简单封装了一下,saveSheet()也是封装,参数不同,这里还有一个备份的方法,可以大概看看,简单的说就是修改文件名,加时间戳.bak 后缀,保存成文件
修改样式
保存和备份文件说完了,这里还需要修改下样式,不然谁知道你最后查出了什么
 1 private static void setStyle(Sheet invoiceSheet, int index, int numberIndex) {
 2        for (Row cells : invoiceSheet) {
 3            Cell cell = cells.getCell(ExcelUtils.getColumnNumber("a"));
 4            if (cell != null && cell.getCellType() == Cell.CELL_TYPE_NUMERIC) {
 5                if (index == cell.getNumericCellValue()) {
 6                    Cell numberCell = cells.getCell(numberIndex);
 7                    CellStyle cellStyle = invoiceSheet.getWorkbook().createCellStyle();
 8                    cellStyle.setFillPattern(HSSFCellStyle.SOLID_FOREGROUND);
 9                    cellStyle.setFillForegroundColor(HSSFColor.RED.index);
10                    numberCell.setCellStyle(cellStyle);
11                }
12            }
13        }
14    }
这里没有封装,只是简单的修改了下 核心代码是
1CellStyle cellStyle = invoiceSheet.getWorkbook().createCellStyle();//创建一个新单元格样式
2cellStyle.setFillPattern(HSSFCellStyle.SOLID_FOREGROUND);//填充方式是前景色
3cellStyle.setFillForegroundColor(HSSFColor.RED.index);//设置前景色为红色
4numberCell.setCellStyle(cellStyle);//将单元格的样式改为新建的样式
到这里简单的修改样式就结束了,只要在这之后保存 workbook 就可以了
结语
这篇文章主要是解析和简单的修改,后面可能会涉及到生成文件,到时候再写篇文章吧